Category Archives: Burda WOF

Faux Fur Vest – Part I

Between Summerset’s adorable, casual faux fur jacket, Tany’s high-fashion jacket with removable collar and the fur vests I’ve been seeing so much of lately I’ve been having some serious faux fur envy! Alas, there isn’t anyplace locally for me to buy really nice faux fur so I had filed that idea away for later. But, last night I was cleaning my sewing room and found a large remnant of pelted faux mink that was taking up quite a bit of space and I thought, why not make a faux fur vest?

I happened to have the same pattern that Summerset used (Burda World of Fashion 12/2007 #122) and I liked the fact that it had darts so I figured I could just omit the sleeves and line the armscye to the edge. I traced off a size 36 and made a 3/4″ FBA and my usual forward-shoulder and swayback alterations. The shoulders on a 36 are usually too wide for me but on a vest that’s actually a good thing so I didn’t narrow them.

pattern

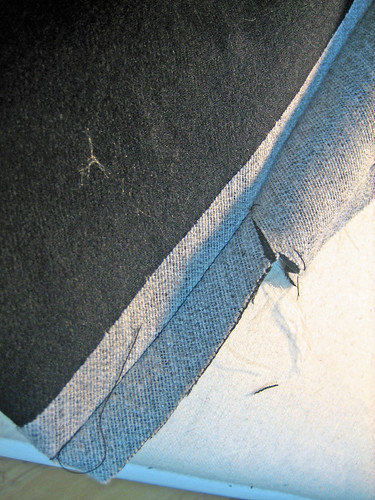
So far, I have sewn the shoulder seams and attached the collar. I cut the fronts so that the facing fold line was on a peltline, figuring it would give me a cleaner edge (which it does). If I wear this closed, the CFs will not match. But, I figured that I would never wear this closed anyway so I’d rather have a full peltline at each edge. I have never sewn with faux (or real) fur before so I’m just assuming that the CF would normally be on a peltline – am I right?

vest

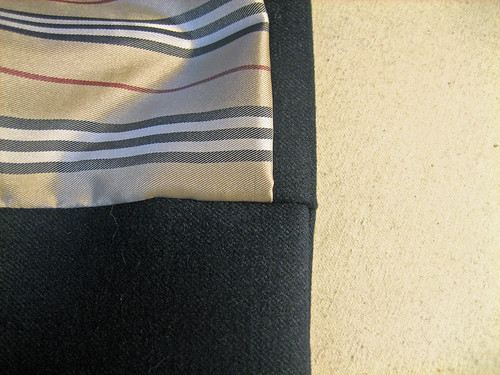
I didn’t have enough fabric for the collar so I cut the undercollar from black Ultrasuede. I had dark brown in my stash as well but the black looked much better (the flash makes the fur look lighter than it is IRL). You can faintly see the casing line for the drawstring along the top edge.

undercollar

I am not planning on putting in the pockets as per the pattern. I had thought about adding in-seam pockets but I doubt I’d ever use them. If it’s cold enough for me to need to use them I wouldn’t be wearing a vest, right?

14 Comments

Filed under Burda WOF, Year of the Jacket

The Year of the Jacket 2010 – in Review

I will probably finish one more jacket yet before the end of the year but I thought it would be fun to look back at what I have already completed. I know some people were concerned about joining the Stitcher’s Guild sew-along for 2011 because they thought they’d have to make 12 tailored, lined jackets – not so! While I love making them, they are not really wearable here during the warmer months. A jacket can be as complicated as a notch-collared style with welts and hand padstitching or as simple as a linen shirt jacket or jean jacket. There are no rules so join in – the more the merrier!

January

#1 McCall’s 5984
blueboucle

February

#2 McCall’s 5984
redboucle

April

#3 Simplicity 2443
violetlinen

May

#4 Simplicity 2443 (modified)
whitepique

#5 Simplicity 7715 (vintage)
redwindbreaker

#6 Simplicity 2443 (modified)
tealpique

June

#7 McCall’s 5860
jeanjacket

September

#8 McCall’s 5635 (modified)
anorak

October

#9 Simplicity 5440 (vintage, modified)
isabelmarant

#10 Hot Patterns Riviera Blvd. Jacket
riviera

November

#11 Simplicity 4109
corduroyjacket

December

#12 Simplicity 2508
velvetcoat

#13 Burda Style 10/2009 #109
duffle coat

44 Comments

Filed under Burda WOF, Hot Patterns, McCall's, Simplicity, Vintage Patterns, Year of the Jacket

Duffle Coat – Final

I spent most of yesterday experimenting with different ways to make the toggles (good thing I had lots of leather in my stash!). I finally decided to copy the toggles from Burda Style.

First, I made my own leather cording. I cut 1″ wide strips of leather with a rotary cutter and quilting ruler.

cord1

I folded them in half and edgestitched along the fold before trimming away the excess (oops, I forgot to photograph that step but you get the idea).

cord2

cord3

For the patch (I’m sure it has a name but I don’t know what it is), I cut a 1.75″ by 3″ piece of leather and punched a hole in the center of one side with my trusty old revolving leather punch.

patch

Thread the toggles onto the cord and pull the cord ends through the hole of the patch. Secure the cord ends to the back of the patch and then trim off the excess.

toggles

stitched

For extra security and to make them easier to handle during sewing, I glued the patch together with Tandy leather glue (my favorite!). Lastly, I coated all of the raw edges with Edgekote. The Edgekote isn’t a must but I like the way it finishes the edges.

glued

edgekoted

It’s a beautiful, crisp winter’s day here in Florida so I thought I’d photograph the coat outside. I love this coat so much that I definitely want to make another, shorter version.

togglefull

Here’s the back of the lining,

backlining

and the front. This lining is very pretty (and Burberry-esque!) but it was awful to work with – soooo ravelly.

frontlining

My next project is a lambskin jacket but I don’t know how much, if anything, I will get done this week. I’ll feel great if I get the pattern fitted and maybe cut out a test garment but I’m not going to stress about it.

Parting shot: Bryan insists on trying to dress up the kitties. Last year, he put a doggie Christmas dress on Ricki! Mrs. Whiskers is here to tell you she doesn’t like it. Silly man!

santawhiskers

Merry Christmas!

38 Comments

Filed under Burda WOF, Tutorials, Year of the Jacket

Duffle Coat – Part IV

Everything is finished except for the toggles and I don’t think I’ll get to them tonight. I started feeling a little under the weather this afternoon and then traffic was a nightmare so I got home a bit later than expected – 45 minutes to drive 6.5 miles, argh! I don’t feel alert enough to work on the most important part of the coat (the toggles!) so I’ll save that for Saturday. And I promise I’ll post the steps!

Instead, I thought I’d write a quick post about bagging a lining. Lots of books cover bagging but most of them don’t ever mention how to properly deal with that little bit of unfinished facing where it meets the hem. So you try to make it look okay with handsewing but it never really does. I’m going to show you how to finish that area easily and neatly by machine. Now, I’m not a technical writer so I just sewed it and took photos of the steps – hopefully the steps are clear. For more professional instructions please refer to Palmer/Pletsch’s jacket book and/or DVD (I don’t believe I’ve ever seen this technique covered in any other home sewing/tailoring book).

To use this technique, partially sew the facing/lining seam (leaving at least a few inches unsewn at the bottom) and press up the jacket hem (but do not stitch). Leave a large opening in one of your sleeve lining seams so that the jacket may be turned right side out later.

Step 1 Turn the facing back and stitch, stopping 5/8″ from the edge (or whatever your facing/lining seam allowance is).

facing1

Step 2 Trim the seam allowance.

facing2

Step 3 Right sides together, stitch lining and hem allowance together. I used a 1/2″ seam allowance in this instance. This lining was a ravelly nightmare!

lininghem

Step 4 Clip jacket front ONLY to the point where you ended your stitching. The wonkiness you see is the hem being pulled up by the lining – pay no attention to that. 🙂

clip

Step 5 Turn hem allowance up (right sides together) tucking lining inside.

hem1

Step 6 Fold facing back out of the way exposing lining/facing seam.

hem2

Step 7 Stitch remaining lining/facing seam down to the hemline.

stitch

Step 8 Turn RS out and Voila! even before pressing it looks good.

beforepressing

Step 9 After pressing.

afterpressing

Step 10 The jump hem is formed automatically.

jumphem

At this point, I hand stitch the hem, attach the sleeve linings to the hems by machine and then turn the jacket right side out through the opening in the sleeve. Stitch the sleeve opening closed either by hand or by machine (my preferred method). If your sleeves have vents, it is easier to hand stitch the lining to the hems after turning the jacket right side out.

ETA: I originally learned this technique from Kathleen at Fashion-Incubator. I’ve been using it for awhile and couldn’t remember where I learned it until I was reminded today. Once you do it once or twice it will just stay with you! Here’s the original link, part of the Nameless Tutorial series: Bagging a Lining. Enjoy!

25 Comments

Filed under Burda WOF, Tutorials, Year of the Jacket

Duffle Coat – Part III

Boy, I’ve had my nose to the grindstone all day today! I spent my birthday doing what I love most (aside from spending time with the people I love, of course!) – sewing. Last night I made a to-do list for today: draft/cut/construct/insert lining, hem sleeves, check length, stitch hem. Well, I finished everything except for the hem because I’d like to attach the toggles throug the outer layer only (at least I think that’s what I want to do). I haven’t made the toggles yet anyway so I decided to finish up tomorrow night. Here’s a peek at the lining. Because this fabric is quite thick and spongy I really needed some sort of back facing so I used the back yoke as a substitute. The pattern does have a back facing but I think the yoke gives it a much more professional look and gives some added body and support through the shoulder area.

lining

Here’s a full view. Do you see what I mean about it being roomy yet slim? I fall more in love with this coat every time I try it on It even looks good over jammies!

full

There were some interesting comments/questions posted the last few days so I thought I’d address one of them now:

Marie: Do you baste pieces in order to get everything so exact? Your work is fantastic! Any suggestions or sources you would recommend for improving the details as you do? I very rarely thread-baste. Instead I might use a pin or two at crucial match points. I try to be very precise with my sewing. In the case of inset corners it is very important to match up the dots. With sewing, as with anything else, practice makes perfect. I always practice on scraps before I stitch on my actual garment. Also, do not be afraid to recut things such as collars and cuffs if they aren’t up to your standards (this is why I always buy extra fabric!).

Did you opt not to make a muslin and if so what was it on this pattern that told you that you would not have fitting issues? I almost never make a muslin (although I will for the leather jacket I’m making next)! Instead, I tissue-fit the pattern and then pin-fit the garment as I go. I also sometimes leave wide seam allowances at the side seams “just in case” so that I never have a fit disaster.

Several of you have asked for my “secret” to perfect inset corners. I don’t really have any secrets but I promise I will go over the steps in a future post. Louise Cutting shares her wonderful method (which is fabulous for lighter-weight fabrics) in her Threads DVDs so you might want to check them out as well.

Lastly, if you’ve enjoyed my Year of the Jacket and would like to join in the fun for 2011 please head over to Stitcher’s Guild. The goal is one jacket per month but the object really is to upgrade our wardrobes, improve our sewing skills and use up some of our yummy stash fabrics. Even if you don’t think you can finish twelve, please join in anyway!

9 Comments

Filed under Burda WOF, Year of the Jacket

Duffle Coat – Part II

After all those inset corners today I didn’t think I had it in me to finish the other side but I soldiered on and did it! Tomorrow, I will construct and attach the hood. I think the coat is looking pretty chic already, don’t you?

sideview

This coat has a lot more shape than the line drawing would have you believe. I know it looks like a big shapless box but it’s actually not at all oversized through the upper body. For most of you, fitting issues should be very minimal with this pattern (I made no alterations except for length) so you can concentrate on those welts and corners. 🙂

Robin asked earlier if it got cold enough here in Florida for a coat. It is 29F right now so that would be a resounding yes! Actually, I find it pretty practical to have some sort of outerwear even though it doesn’t get cold often. I can toss a jacket or coat over my usual clothes and remove it as the day warms up (which it always does). You cannot do with a sweater!

18 Comments

Filed under Burda WOF, Year of the Jacket

Duffle Coat – Part I

There’s been a last-minute change of plans for the duffle coat. As I was fitting the vintage pattern yesterday, I realized that it was much more closely fitted than what I wanted. So, I have decided to make this little lovely from the 10/2009 issue of Burda Style (it’s #109) instead:

burdacoat1

budacoat2

The pattern calls for doublecloth but I don’t have anything suitable on hand so I’ll be using plain black wool and lining the coat conventionally. So far I have sewn the welt pockets,

welts

and attached the yokes, sleeves and body on one side (which is a bit time-consuming with all of those inset corners!). I lightened the photos a bit so you could see the details:

front

back

8 Comments

Filed under Burda WOF, Year of the Jacket

Burda Style 01/2009 #106

When I was organizing my pattern magazines and tracings, I came across this top that I had traced off last summer and never got around to making up. I wear a lot of knit tops and am always on the lookout for new and interesting styles. Naturally, I fell in love with these sleeves.

burdastyle106

The fabric is rayon/lycra that I bought from Sawyer Brook a few years ago. I’ve pulled it out quite a few times but never had just the right project for it until now. I started with my usual size 34 but found this pattern baggy through the torso. Either the Power Circuit Training DVDs are finally paying off or my fabric has too much stretch. Not only did I skip the FBA, I took it in about 1/2″ on each side (for a total of 2″).

106front

I changed the neckline from a V-neck to a scoop neck and bound the edge. Instead of coverstitching the hems, I used my blindstitch machine for a dressier look.

106binding

Seriously, how freaking adorable are these sleeves? I know some people cut the sleeve apart into four pieces to make gathering easier but I had no difficulty making them as per the pattern. To make your corners really nice and crisp overlock across the gathered section only, then fold the seam allowance up (towards the cap) and overlock each side seam (sort of like a wrapped corner collar).

106sleeves

50 Comments

Filed under Burda WOF

Burda Style 02/2009 #119 – Finished!

All done but the hem, anyway! This is such a pretty style. It is simple but the sleeves make it different and special. I did have a couple of issues, though. First, the neckline was too high and made me look like I had a big, heaving bosom. It’s hard to tell from the photos but I actually took the neckline down by over an inch, ending about 5/8″ above the yoke seam tapering to nothing about 1″ in front of the shoulder. It’s a much more flattering look for me and I’m happy I took the time to “make it work”.

Here’s the before:

originalfront

Phyllis suggested I use the pink section of the fabric for my neckline binding and, I have to say, she was so right. I like it much better!

The after:

newfront

The other issue I had was with the sleeve. For some odd reason (which I didn’t notice until after I had finished cutting), the inner sleeve is the same length as the outer sleeve. For it to bubble properly it really needs to be a little shorter than the outer sleeve so before I make my dress I will lengthen the outer sleeve .25″ and shorten the inner sleeve by the same amount. Also, the instructions have you understitching the seam allowances to the undersleeve. I didn’t do that because I didn’t want to stiffen the seam and lose some of the drape of the sleeve.

I can show you the fabric I am going to use for the dress now that my cut has been secured. It’s Italian Rayon Florida Knit – Jewel Tones from Gorgeous Fabrics. Hurry, it’s on sale and there are only a few yards left!

floralrayon

What’s next? Well, tomorrow is September 1st (how did that happen?) and I’m a little freaked out because I still have 5 jackets to complete by the end of the year. Aye! And then there’s the Big Bow Skirt and the dress from the September Burda Style and the Knip Mode skirt and, and, and. It’s official: there is never enough sewing time.

17 Comments

Filed under Burda WOF, Fabric

Burda Style 02/2009 #119 – Part I

Yeah, I know I’m supposed to be working on the Big Bow Skirt. I’m on the fence about my fabric choice, sigh. Instead, I decided to tidy up a bit (so that I’d quit obsessing over the skirt!) and I found this top/dress that I had traced off last summer. I have found the perfect fabric for the dress at Gorgeous Fabrics (no, I’m not going to show you lest you buy it all!) so I thought I’d do a quick test of the top to check the fit.

dress

top

I am such a sucker for prints like this (as if you didn’t know)! I believe this came from Gorgeous Fabrics. I cut one section at a time, laying everything out on the floor as I went along. I cut the upper bodice a several times before deciding on this particular layout (I use my camera as 2nd set of eyes). The neckline will be bound with the green.

0209119front

13 Comments

Filed under Burda WOF, Fabric