Category Archives: Alterations

Milly Blouse – Part IV

Sad to say, I accomplished nothing this weekend! It was a big football weekend, which ordinarily would mean loads of ME time but, due to a series of unfortunate events, it didn’t work out that way.

Now, it’s Monday and I’m back on track! After wearing the test blouse, I decided that I’d like to lower the neckline about 1″. I figured 1″ would give me enough “breathing room” without compromising the look I’m after. If you go to the Milly site, you can see that the original neckline is pretty high. Mine’s going to be a lot lower so I may have to shorten the ruffle, which is okay with me.

Here is how I altered the neckband:

neckband1

I drew a vertical (red) line just to the outside the shoulder seam and marked a match point across the line (also in red). I then slashed the pattern apart, marked another line 1″ below the match point (2nd red line) and slid the CF section down and trued the curves.

Here’s how the new and original pieces compare:

neckband2

Tomorrow, I will alter the bodice front and then sew up a quick test garment to check my alterations. I also need to add the hidden placket. Then, it’s cutting time!

My new crystals arrived today! I lucked into these beautiful square Swarovski sew-on crystals at a really good price on Etsy. Unfortunately, the seller only had 16 but I think I can make that work. If not, I’ll save them for something else and use the crystal beads I already have.

rhinestones

13 Comments

Filed under Alterations, Aren't you glad you sew?, Butterick

Vogue 8598

I expected to have this finished days ago but you know how that goes. I know it needs some touch-up pressing but didn’t feel like waiting for the regular iron to heat up. 🙂 I started with my usual size 8 and made the following alterations:

*1.25″ full bust adjustment
*.5″ broad back adjustment
*.625 forward shoulder adjustment

I also shortened the sleeve by 1″ as I always do. I don’t always make a broad back adjustment, it really depends on the pattern. This shirt is quite fitted so I really needed it – especially if I intended to drive a car while wearing it! During fitting, I ended up taking the front seams in about 1/2″ under the bust to the hem. And I took in the side seams at the 1/2″ on each side at the waist, tapering in to 1″ at the hip. This pattern has a beautifully flared hipline, unfortunately I don’t.

8598front

As you can see, the sleeves are much more gathered than they appear in the line drawing. To be honest, I think this particular sleeve would work much better in a lightweight, drapey fabric such as crepe de chine. While it’s very pretty, it’s a bit more billowy than I’d prefer for this fabric.

8598sleeve

To give you an idea of how much gathering is in the sleeve here is a closeup of the cuff (the interfacing is Pro Sheer from Fashion Sewing Supply – great stuff!):

8598cuff

The MOP buttons are from my stash. While I don’t particularly love square buttons, these matched my voile perfectly, happened to be the right size and I had the required number (15!) on hand. It’s been a very long time since I shopped for buttons so I did have a quick look for alternatives when I was at JoAnn’s on Friday. All I can say is that I’m really happy to have such a large button collection!

That’s it for today – I’m heading back to my sewing room. Spaghetti sauce is cooking in the crockpot and I’ve vowed to ignore all housework until Tuesday. 🙂

7 Comments

Filed under Alterations, Vogue

Simplicity 3786

The dotted Swiss has been washed and pressed and the pattern has been altered. I had to make a full bust adjustment, my usual forward shoulder and sway back adjustments and (highly unusual!) I had to widen the upper sleeve by 1/2″. I’m so glad that Ann warned me about the slimness of the upper sleeve because that’s not something I ever need to do!

tissue

I’ve just finished my final tissue-fitting. With all of the alterations and the pinned front tucks I decided I’d feel much better if I use something other than my precious Swiss for the first version. Everything looks great but I just want to be 100% certain that the fit is perfect. I have several beautiful cotton voiles from Ascher in my collection, I chose this one because it’s so Provencal!
voile

I’ll get this cut out now, then I really need to do a little bit of housework. If I work really fast I’ll get back to my sewing room later today. My thoughtful honey picked up some steaks and baking potatoes for dinner so I don’t even have to cook, yay! 🙂

1 Comment

Filed under Alterations, Fabric, Simplicity

Kwik-Sew 3616

As promised, here’s a quick review of the alterations I made to this pattern. After cutting out a test upper bodice, I determined that I’d need about 3/4″ in additional length over the bust in order for the seam to ride under my bra. Heaven forbid, as Heidi Klum says, that the boobs aren’t in the right place! Since the upper bodice is very loose fitting (and has gathers under the bust and at the shoulder) I didn’t require any additional width. I simply marked the additional length on the pattern and used my French curve to draw a smooth line.

fba

Neckline gaposis is often a problem on fuller-busted figures and is really easy to fix. I discussed this alteration HERE a few years ago (hit your browser back button to return here). The objective is to shorten the facing and ease the extra fabric of the neckline to it. I did a down-and-dirty job of it here. Unlike my previous tutorial, the outer edge of this facing is not sewn to anything else so I just tapered to nothing at the cut edge.

facing1

This does change the shape of the facing from a straight on-grain piece to a curved piece as you can see upon comparing the altered piece with the original.

facing2

What about the grainline, you ask? I changed the grainline to the center front. Cutting a straight facing on-grain serves to stabilize the neck edge. Once the facing becomes curved that is no longer possible. The facings are interfaced and the neck edges eased to it so stretching really isn’t an issue, in my opinion. If you wanted to use straight tape I guess you could but I don’t think it’s necessary and would just add bulk.

facing3

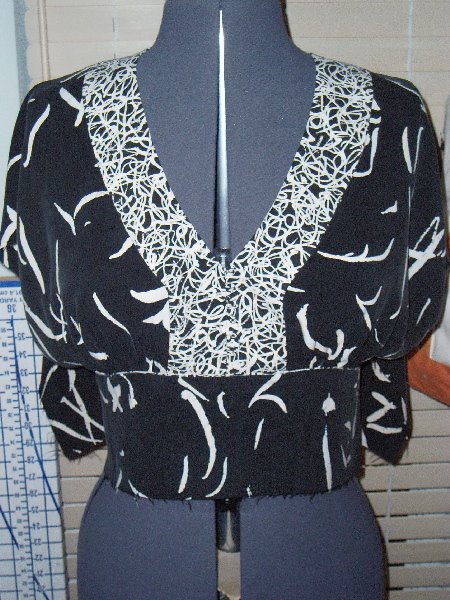
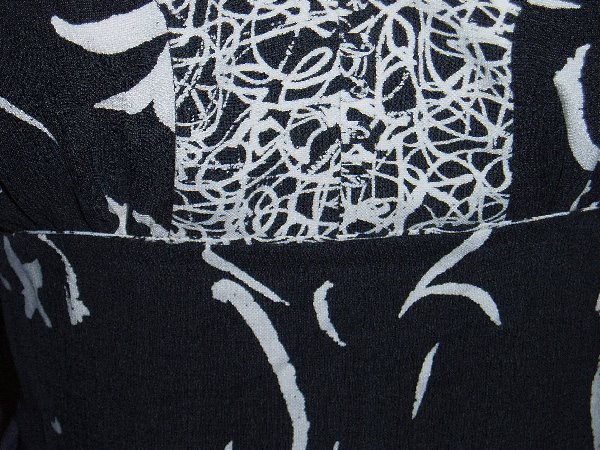
Some of you may remember this fabric that Ann sent me last summer. It’s the Boho Chic Jersey in a different colorway.

boho

If you’re new here, this was the must-have fabric of 2008! I used it for this dress (the Hot Patterns Cosmopolitan Dress):

bohochicdress

I thought it would be perfect for Kwik-Sew 3616 and you know how much I love to play around with patterns! I think the most important thing to do when working with a panel print is to plan carefully and never, ever overcut – you don’t want to cut into an adjacent panel or border that you might need later. This means your yardage will resemble Swiss cheese when you are done. 🙂 As I cut out the sections I lay them on the floor so that I can get a better idea how it’s all going to fit together. I actually cut the lower bodice so that the border would wind up in the hem – I wanted as little white directly on my stomach as possible.

3616front

I decided to seam the center back since it was too wide to fit into one panel. I would have liked a smoother transition over the shoulder but there just wasn’t any way to work that out due to the size of the pattern pieces.

3616back

Once I’m finished sewing this version I think I’ll transfer the paper pattern to manila so that I have a nice, sturdy permanent pattern. This one’s a keeper.

7 Comments

Filed under Alterations, Fabric, Hot Patterns, Kwik-Sew

Alterations…

Jess dropped off a little gift for me on Wednesday.

jeans

By Wednesday night I received the following text: ‘how r my pants coming?’. I promised that I would get to them this weekend ’cause I just love hemming, you know? 🙂 This morning I awoke feeling pretty sluggish. I stayed out way too late last night and made too much merriment. I figured it was a good time to hem the pants. Either that or screw up my silk tunic.

I used to dread hemming jeans but the walking foot machine has turned this chore into a super-quick and easy job. I just cut the excess length off with a quilting ruler and rotary cutter. I allowed a 1″ hem – 1/2″ to be turned under twice. I don’t bother to press. I just eyeball it and fold it under as I go.

jeansprogress

Here are the cords all finished. The stitches look wonky but that’s corduroy for you. I was too lazy to wind a bobbin with white topstitching thread so I just used the #69 bonded nylon that was already on the machine.

jeans3

When I got to the jeans I called Jess and told him I didn’t have any orange topstitching thread so these would have to wait until I could get to the store. He informed me that he did not care what color I used and that no one would notice anyway. He suggested black then I was going to use navy but, in the end, I decided on plain old blue jean gold. I’m not thrilled with it but it’s done. I will pick up some orange topstitching thread next week so that I’ll be ready next time.

jeans4

Now he wants to know when I’ll be finished with the four dress shirts that need tapering…

I also bought myself a present this week:

jukiguide

This is a swing-out adjustable cloth guide for my overlock. It will really come in handy when I’m using knit patterns that have 3/8″ or 5/8″ seam allowances. Too bad I forgot to order the attachment screw…

Parting shot (thanks to Summerset for starting this trend!)-

My dad, who lived in Cannes, sent me this several decades ago. It’s meant for tablescraps. Without it’s lid it is perfect for bits of fabric and thread – very handy right behind the sewing machine, n’est-ce pas?

poubelledetable

4 Comments

Filed under Alterations, Sewing Machines

Banded Surplice Neckline Tutorial

The banded surplice neckline tutorial for the HP Cosmopolitan Dress is up at The Sewing Divas! Here’s the LINK.

Comments Off on Banded Surplice Neckline Tutorial

Filed under Alterations, Hot Patterns, Tutorials

Hot Patterns Sunshine Tops – Part 3

Well, my plan to move some of the gathers further up over the bust didn’t work as well as I’d hoped. You can see from the Very Bad Bathroom Mirror Photo (I’m sorry, I know it’s blurry) that it causes weird wrinkles/folds above the bust. I should have been able to anticipate that. Plan B: I’ve marked a new gathering area on the neckband and will need to rotate the FBA to a vertical dart and rotate that out at the side seam. I really want to get this just right because I know I will be making this top again and again – it’s really pretty.

7 Comments

Filed under Alterations, Hot Patterns

Another New Dress – Part 2

As you can see, work on the dress hasn’t come very far. I’ve had a busy work week with very little time to sew. I didn’t make much progress on Memorial Day either! However, I am determined to finish it up this weekend as I’m feeling guilty about the many UFOs in my sewing room. Yet, I just keep starting new projects because that’s more fun than trying to remember where I was on a project I stopped 6 months ago, sigh. Must. Get. Organized!

Anyway, I wanted to take advantage of the coordinating fabrics I chose for the project. Yet, I didn’t want to give the dress too much of a bohemian look with lots of pattern blocking. Instead of using the contrast for the midriff inset I decided to use 1/8″ uncorded piping in the seam instead. I think it’s a very nice, subtle detail, don’t you? I’m still on the fence about the hem bands. I have cut them out of the main fabric with the intention of simply piping the seam but now I’m wondering if I should use the contrast fabric instead? Decisions, decisions. I might have to try both before I make a commitment.

In this second photo you can just barely see the buttonloops I added at the center front. I have some lovely vintage pearl buttons that will be added shortly.

4 Comments

Filed under Alterations, Fabric, McCall's

Neck Sizes


When I taught shirt-making I was often asked how to change the neck size of a pattern – usually how to increase the size. We are so used to simply adding on to a pattern in order to grade it up yet that is exactly the opposite of what must be done to increase the neck size. If you were to simply add on to the neck edge it would become smaller as you can see from the pattern here. In order to increase the neck size you must make the opening larger by removing material. Little or nothing is removed at the back neck edge as neck size does not increase in that area. Of course, the easiest thing to do is buy a pattern that has cutting lines for various neck sizes like Kwik-Sew 2777 that is shown here. However, that doesn’t always fit in with our plans, does it? If you make a lot of shirts you can cheat a bit by making templates from a pattern such as this. It works and it’s easy to do.

Once you’ve made the neck opening larger you will need to increase the length of the stand and collar. I like to walk the neck edge along the stand to see how much extra length I’ll need. On my son’s shirt I needed an extra 2″ so I slashed the stand in four places and added 1/2″ at each slash. I knew I’d need 2″ in the collar as well but I walked the collar along the stand just to be sure. A typical shirt collar runs from center front to center front but you’ll want to check your pattern in case it’s different from the norm.

Comments Off on Neck Sizes

Filed under Alterations, Fabric, Patterns, vintage, Tutorials