
I stayed up last night and finished the hems and lining, bring on the cold front!

I stayed up last night and finished the hems and lining, bring on the cold front!
Filed under Year of the Jacket
It’s been in the mid-80s for a number of days so I haven’t felt like working on the jacket as much. But, now that I’m in the home stretch I am anxious to get it finished. We have a cold front coming through mid-week so maybe I’ll even get to wear it! I swear, my garden doesn’t know if it’s winter or spring these days. My trees are dropping their leaves and blooming at the same, sigh.
The last bit of inner construction to be finished before putting in the lining are the fur hooks. I used an awl to make a hole large enough for the hook to pass through (If you are using fur with a knit backing you could make a small snip) and then stitched it on securely from the inside.


From the outside, all you see is the hook portion.

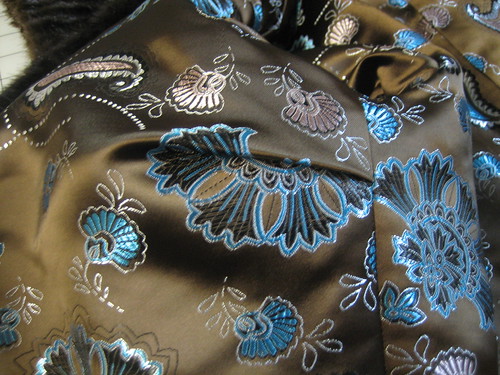
The lining has been assembled and attached except for the hems. This rayon brocade practically screamed my name when I stopped into JoAnn’s for a thimble (yes, I broke down and bought one). I rarely bother to look at their fabric but there it was, right on the aisle in one of my very favorite color combinations.

Rather than sewing the bust dart in the lining, I opted to simply fold it. I saw it done this way in a ready-made fur coat and thought it not only looked nice but provided a bit of wearing ease as well.
Another detail that I copied from a ready-made jacket (in this case my Persian lamb) is a pleated piping along the back neck edge. I am assuming that this piping served to protect the fur from soil and wear. I think it’s a pretty and luxurious detail, don’t you?

Once I finish up the hems, I think I’d like to work on a couple of quick and easy projects before moving on to my next jacket. A palate cleanser of sorts!
Filed under Year of the Jacket
We interrupt the faux mink jacket to bring you – by popular request – a pattern matching tutorial! Many of you are participating in the 2011 Men’s Shirt Sew-Along over at Male Pattern Boldness and a couple of my readers asked me to write about matching patterns across the front opening. It’s easy, easy, easy!
I am using a small-scale pattern to better illustrate the process. Note that I have marked the center front (and the foldline but we don’t care about that at this point) on the front of the pattern,

and the back (very important!).

Step I: With fabric single-layer, cut your right shirt front. Make small clips at the top and bottom of the center front line (the most important step!). I have marked the center fronts with chalk for visibility.

Step II: Remove pattern and lay the newly cut front section (right side up) onto your yardage, matching the pattern exactly (can you even see it?). Put a pin at the CF clips you made earlier.

Step III: Turning your pattern piece over, align the center front line with the pins (be precise!) and cut out your 2nd piece.

Voila, that’s all there is to it! And, as you can see here, the pattern will match whether the garment will be buttoned right over left (for women),

or left over right (for men or unisex garments).

Filed under Tutorials
I was finally able to get back to the jacket today, yay! I stitched the darts, shoulder and side seams and attached the collar. Because the fur is so plush I had to trim it out of the seam allowances (best done over a wastebasket!). To keep the seam allowances flat, I catchstitched them to the backing. I did the same with the darts after slashing them open.


One of my favorite parts, the back of the collar.

All I have left now are the sleeves, hems and lining. Not too much but everything does take a little longer in fur. I hope we have a few more cold days so I can wear this at least once. Speaking of cold days, I am shocked at how much I am wearing my fur vest! It turns out to be the perfect thing to throw on when it’s just a little chilly. I think I need another one (just an excuse to sew with fur again).
Filed under Year of the Jacket
