I finally finished my 3rd pair of HP Marrakesh Pants – I looove this pattern! I’ve had this piece of sueded Tencel gauze in my stash for at least 4 years. It came from Cynthia’s Fine Fabrics and was originally intended for a skirt. It has a crinkled texture and a nice, heavy drape. I made sure to press all the crinkles out before cutting. If you’ve ever worn anything made of gauze you know how your body heat will cause it to bag out very unattractively because your body is actually “ironing” out the creases. I also over-fitted these, taking an additional 1″ out in width through the waist and hip area because I know they will stretch with wearing.

I’m not a huge fan of contrast facings (not a criticism, they’re just not me) but my fabric is kind of heavy and self-fabric would have been too bulky. Unfortunately, I didn’t have any solid fabric that blended so I used this cotton/lycra shirting. I’m not really crazy about it but no one will see it and it is a casual pant, after all. I intend to wear these with a white tank or tee and flat sandals.
Once again, I did not use the pocket and this time I skipped the drawstring as well. I love drawstrings but my fabric was too heavy for self-fabric ties and I wasn’t able to find any suitable substitute. Since this is a “real” waistband, I interfaced with Pro Sheer Fusible and used fusible straight tape to stabilize the upper edge.

Speaking of straight tape, I also used it to stabilize the bias area of the crotch. I hate nothing worse than a saggy bottom so I use the straight tape in all of my pants to maintain the curve. You can also use twill tape or lining selvage but fusible tape is most convenient. I always lay the pattern on the fabric to make sure nothing has stretched or shifted before I press the tape on.

Once finished, the pants seemed a bit plain without the drawstring so I decided to add cargo pockets on both sides. I made the pocket 5″ wide and 6″ tall and added 1/4″ seam allowances and a 1.25″ hem allowance at the top (I wanted to make sure that the button would be sewn through two layers). The flap is 5.25″ wide and 2″ tall. I used 1/4″ seam allowances at the sides and bottom and 5/8″ at the top. I know the stitching looks wonky in the photo but that’s just the crinkles in the fabric.
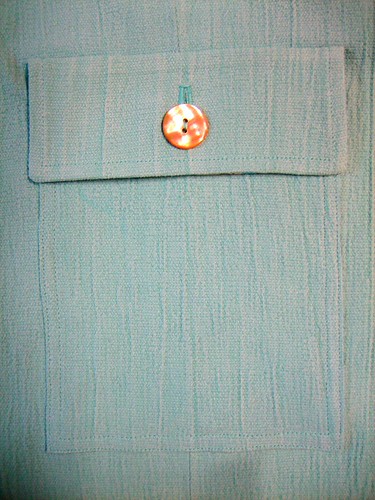
I used the Armani pocket flap technique I learned from Louise Cutting many years ago. It’s very neat and flat. Basically, the flap is stitched into it’s final (down) position with a 1/4″ seam allowance and then pressed up and restitched so that all raw edges are encased and no stitching shows on the outside.

Because I wanted the pocket to be soft, I only used interfacing in the hem allowance (mainly because of the button). The flap is not interfaced. To help me figure out the placement I simply put the pants on and pinned the pocket where I thought it looked best.


