Monthly Archives: April 2010

Simplicity 2443 – Final!

Yay, I am finished! I’ve been working on this jacket so long and it feels really good to be done. As suspected, the sleeves were just a little too long and needed to be shortened by 5/8″.

2443front

I also reduced the gathering on the sleeves which called for longer cuffs. Actually, since I decided I didn’t want the D-ring detail on the sleeve cuff I was able to trim down the extra-long existing cuff.

I had a few ideas for the cuffs but finally settled on something low-key since there is so much going on in the front of the jacket. I found these beautiful buttons in my collection and just made a scaled down version of the front loops for fastening.

cuff1

cuff2

One thing I will change on the next version is to bring the placket a bit more towards the front. It just seems too far back to my eye.

2443back

I really love the shape of this. Notice how the back curves up. It’s a very flattering little jacket that could be a really good basic. As I mentioned before, my next version will be in a white embroidered linen with simple button loops and MOP buttons.

I’m sure many of you notice that the sleeve is hanging off-grain on Ethel. Unlike Ethel, I have quite forward shoulders so they do hang nicely on me.

2443side

Now, for the fine print: I started with my usual size 8 (I’m a lot smaller through the shoulders and upper chest than I appear!) and made a full-bust adjustment. I kept some of the FBA in a horizontal dart (which you really can’t even see because of the pockets) and transferred the rest of it to the existing vertical dart. I also made a forward shoulder adjustment and shortened the sleeves. These are typical adjustments that I make to nearly every pattern so no surprises here.

21 Comments

Filed under Simplicity, Year of the Jacket

Simplicity 2443 – Part VII

I am on a mission to finish this jacket this week. It’s already the end of April and this is only my 3rd jacket! Since jacket #4 is from the same pattern (in yummy embroidered white linen) I can hopefully make up some time. I’ll tell you, every time I try this jacket on I fall more in love with it. It will work with pants, dresses, skirts – even shorts.

I set the sleeves in today. Ordinarily, I would finish the cuffs before setting the sleeves but I have a feeling I might want to shorten the sleeves a wee bit. Sometimes it’s just hard to tell until it’s all together, you know?

2443front

Since this jacket is unlined I wanted to bind the armscye for a nice, clean look. After trimming 1/4″ off the armscye, I cut bias 1.25″ wide and stitched it on RS together in a 1/4″ seam. Wrap the binding over the seam allowances and stitch in the ditch to secure. Since bias doesn’t ravel there is no need to add bulk with an inside fold. Note that I didn’t join the binding into a circle. I simply folded back the binding at the starting point.

stitching

ditchstitch

After securing, trim away the excess with applique shears and press.

trimming

I think this looks so much nicer in an unlined jacket than overlocking, don’t you?

armscye

17 Comments

Filed under Simplicity, Year of the Jacket

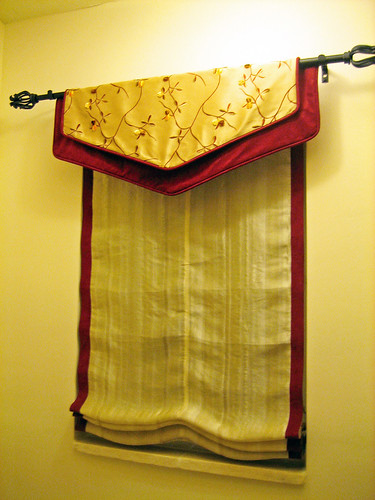
Window treatments – Final

I dragged myself out to Home Depot in a monsoon this morning to buy a decorative rod for the bathroom. I did manage to finish the valance – what took the most time was deciding on a design – with the polyester fabrics fighting me the entire way! (Please note that JoAnn’s still has this fabric in other colorways – do not be seduced by it’s beauty, walk on by!)

roman1

I use a lot of polyester knits and find them very easy to sew but poly wovens, argh. Give me natural fibers any day! Ultrasuede is generally very easy to sew but this is Facile (I think the new name is Ultrasuede Light) and it’s a tad too drapey for this type of treatment. Not it’s fault, it just happened to be the right color for this project! The embroidered poly really pushed the limits of my new boiler iron and still there are puckers. Oh well, it’s up and the rest of the fabric is in the trash.

PARTING SHOT:

My neighbor gave me this air plant mounted on a cedar slab. How nice is that? Air plants live on just that – air. It appears to have some sort of flower stalk so I can’t wait to see how that develops. The cedar was from the wall unit I demo’d in my living room awhile ago. I gave some of it to my neighbor and the rest to a friend’s dad. Woodworkers don’t turn down good wood anymore than we’d turn down good fabric!

airplant

11 Comments

Filed under misc., Sewing for the Home

Window treatments – Part I

I don’t know where the week has gone! Today I thought I’d try to finish up at least one project and decided to work on the Roman shade for my bathroom. I was going to trim the edges with that beautiful embroidered fabric I showed you a few weeks ago but it was impossible to turn under the edges due to the highly dimensional embroidery. Instead, I used strips of Ultrasuede from my stash. I LOVE it when I can use something I already have! The silk was free and I already had the shade tape and cord. All I had to buy was a small scrap of wood for the mounting board, a cleat and three screw eyes for a total of $4 and change.

I’m so pleased with the way this turned out! I wanted the shade to be extra long so that I could keep it closed but still have the interest of pleats at the bottom. This woven-stripe organza works very nicely for a soft shade and is easy to work with (except that it ravelled like crazy!). Please forgive those ripples on the left – nothing a few minutes with the steamer won’t fix.

romanshade1

romanshade4

Here you can see the Ultrasuede trim a little better.

romanshade2

I used a wooden cord end from my stash to neaten up the pull cords. I knotted the cords in two places: half-up (in case I want to open the window) and fully down. That makes it easy to put the shade at the desired height.

romanshade3

I’ve made many Roman shades over the years. They aren’t difficult as long as you are accurate and careful in your measuring and ring placement. The most important thing I can tell you is not to freak out if your shade doesn’t pleat nicely at first. The shade must be trained so raise it up, adjust the pleats and leave it alone for a dayor so. Once trained, your shade will fold up nicely every time.

I am still planning on using the embroidered fabric for the valance. I thought I had a small decorative rod around here somewhere but I can’t seem to find it so I won’t be able to do that today.

15 Comments

Filed under Sewing for the Home

Simplicity 2443 – Part VI

I mentioned what I like to call the “Magic Placket” a couple of days ago. I learned it from Nancy Zieman eons ago and I think it’s been around for some time. It is super easy but works best with lightweight fabrics (like fine shirtings). My linen was borderline too heavy for this technique but it wasn’t anything a couple of whacks from the clapper couldn’t fix. I apologize in advance for all the little threads – I don’t know why I didn’t notice them before I started taking pictures (maybe because I’m too vain to wear glasses…).

Here’s my sleeve pattern. Notice that the placket area is a box. If your pattern is different, just draw your own box. The stitching line would be the finished width (I like 3/4″ to 1″ but you can make it narrower if you like) and then you just add on 1/4″ seam allowance.

sleevepattern

How wide to cut the placket piece? You will cut a strip twice the width of your finished placket plus two seam allowances. For instance, if your placket is going to be 3/4″ wide you would cut a piece 2″ wide (3/4 + 3/4 + 1/4 + 1/4). I like to cut the piece longer than what I need and trim off the excess when I’m finished.

Before you begin, turn under 1/4″ on one of the long edges of your placket.

foldededge

And staystitch the top of the placket box and clip into the corners. I confess that I only staystitch on loosely woven fabrics and don’t usually bother on tightly-woven shirtings.

staystitch

Now you can straighten out the seam and stitch. I like to sew the right side of the placket to the wrong side of the sleeve so that I can do my final edgestitching from the right side. If you prefer to do it the opposite way, that’s fine too.

stitching

Once the placket has been attached, press the seam allowances towards the placket.

press1

Turn the sleeve over and just cover your stitching with the folded edge. Edgestitch and press.

press2

Now for the magic part:

fold1
fold2

Finally, you can topstitch the placket any way you wish.

final

Isn’t this so much easier than this?

placketpattern

And, to prove that good things come to those who patiently wait, my friends Jim and Tom found this gorgeous slab (oops, it’s a little wet from the sprinklers) for my bathroom vanity for practically nothing! I had originally chosen a brown granite but I decided that a light countertop would look better on the dark vanity. With sinks and labor, this will cost a fraction of what I was quoted. I just love it when a plan comes together!

slab

Parting shot:

My bottlebrush tree is blooming! This one’s still a baby. I lost my old one during hurricane Wilma (some of you may remember that it crashed into my car) and it took two years to find another one. Every time I look at it, it makes me happy.

bottlebrush

24 Comments

Filed under House, misc., Simplicity, Year of the Jacket

Bathroom curtain

I’m so sick of looking at the naked window in my WC. I’ve decided that I’d like a bamboo Roman shade in a nice deep color. Unfortunately, none of the ready-made sizes even come close so mine will have to be custom ordered. Since I still need sinks and a countertop, the shade will have to wait until I find a job!

While rummaging through the dresser where I keep my home dec fabrics, I found these two beauties (very wrinkled, sorry!). I know they look the same color as the wall but they aren’t. I just had trouble capturing the colors as the overhead light casts a golden glow onto everything. The main fabric is a very crisp and sheer silk stripe. I think it would work well as a Roman shade. The other fabric is beautifully embroidered and the colors work very well but I only have two small pieces. I could possibly make a valance or trim the shade with it, I don’t know. I always find these little bathroom windows tough so if you have any ideas, please feel free to share them!

curtainfabrics

I finally hung the “sewing art” I made in February. I thought the shears looked nice hanging with some vintage shoe lasts at the entrance to my closet.

sewingart

I have made some progress on the Cynthia Rowley jacket (remember that?). I disregarded the pattern’s instruction for the sleeve placket and used what I call the Magic Placket instead. However, that means I’ll have to make a couple of changes to the sleeve band. It’s fun to just wing it sometimes! I’ll try to post photos tomorrow, time permitting. I probably don’t even have two hours left on this jacket and I’m pretty anxious to finish it and start on Jacket #4.

13 Comments

Filed under misc., Simplicity