Finally! I have had all the “ingredients” assembled for awhile so I was anxious to get started. In case you’ve forgotten, here is the inspiration jacket:


I used this vintage pattern, Simplicity 5440, as my starting point.

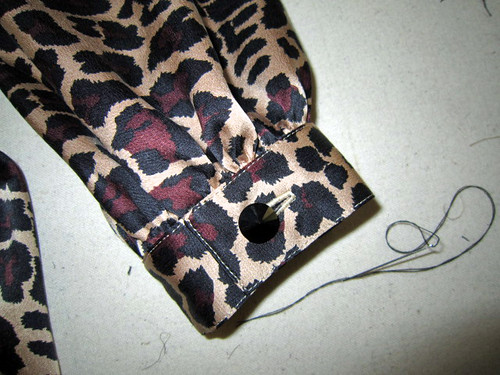
I love working with vintage patterns because you get details and drafting that you can’t find in most modern patterns. Check out this sleeve hem (and, remember, this is an elasticated, casual sleeve!):

After tissue-fitting the pattern, I made my adjustment (sleeve length only) and cut the main pieces out in flannel. The original jacket is puffy (the description says quilted) so I wanted the same feeling without it being quilted. Back in the 1990s when we made tailored jackets out of blouseweight fabrics, I always used flannel as an underlining. It served two purposes: 1) it beefed up the fabric without making it stiff and 2) solved the (at the time) problem of successfully fusing to a silky fabric. This is just cheap flannel from JoAnn’s that I prewashed/dried several times. I have to say, I was looking for a thinner/cheaper flannel and this one is actually a pretty decent quality. Go figure.

I used the flannel to work out my neckline changes as shown here:

Then I used the flannel pieces as my pattern. This is actually a really good way to “test” a pattern before committing to your good fabric. I simply serged the flannel underlining to all of the brocade sections and then treated them as one layer for the remainder of the construction. The serging is necessary because brocade ravels every time you look at it funny.
First up, the single welt pockets. I always use this welt pocket pattern that I got from Judy Barlup when I attended a sit-and-sew class with her a number of years ago. It’s nice not having so much bulk at the sides. I drew the lines to help me center it on a motif.

Here’s what the welts look like once they are sewn:

and turned/pressed:


I drew two lines 1/2″ apart on a piece of stiff non-woven sew-in interfacing and marked the ends of the welt. I basted this into position on the welt stitching line (the lower line). Make sure you go past the ends of the pocket, this makes positioning the welt from the right side easier.

Then, I positioned the welt on the right side of the garment and stitched on the same line (from the wrong side), this time being sure to stop at the ends of the welt.

Next, I laid the pocket pieces (plain old Symphony broadcloth) over the welt and,

stitched over the previous stitching again and stitched on the 2nd line, stopping my stitching about 1/2″ from the ends.

Now for the scary part: cutting into your jacket front, yikes! Using a very sharp pair of scissors, trim right into the corners, being careful not to cut the welt or the pocket bags. I use the fingers of my left hand to keep everything out of the way.

Turn everything to the inside, flip up your welt and you’re almost finished!

Here’s what the inside looks like. I trimmed away some of the excess interfacing and stitched down the little triangles (you can see them at the top of the pocket) before sewing the pocket closed. I made the bags larger than I thought I needed and trimmed them down once I attached the zipper.

The body of the jacket with the completed welts. Note that I decided not to make the chest pockets. I didn’t think they really added anything to the jacket so why bother?