Category Archives: Sewing for the Home

Window treatments – Final

I dragged myself out to Home Depot in a monsoon this morning to buy a decorative rod for the bathroom. I did manage to finish the valance – what took the most time was deciding on a design – with the polyester fabrics fighting me the entire way! (Please note that JoAnn’s still has this fabric in other colorways – do not be seduced by it’s beauty, walk on by!)

roman1

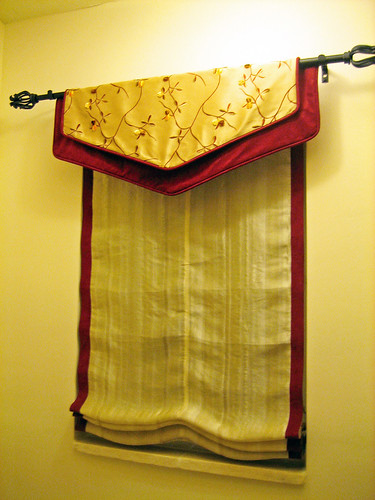
I use a lot of polyester knits and find them very easy to sew but poly wovens, argh. Give me natural fibers any day! Ultrasuede is generally very easy to sew but this is Facile (I think the new name is Ultrasuede Light) and it’s a tad too drapey for this type of treatment. Not it’s fault, it just happened to be the right color for this project! The embroidered poly really pushed the limits of my new boiler iron and still there are puckers. Oh well, it’s up and the rest of the fabric is in the trash.

PARTING SHOT:

My neighbor gave me this air plant mounted on a cedar slab. How nice is that? Air plants live on just that – air. It appears to have some sort of flower stalk so I can’t wait to see how that develops. The cedar was from the wall unit I demo’d in my living room awhile ago. I gave some of it to my neighbor and the rest to a friend’s dad. Woodworkers don’t turn down good wood anymore than we’d turn down good fabric!

airplant

11 Comments

Filed under misc., Sewing for the Home

Window treatments – Part I

I don’t know where the week has gone! Today I thought I’d try to finish up at least one project and decided to work on the Roman shade for my bathroom. I was going to trim the edges with that beautiful embroidered fabric I showed you a few weeks ago but it was impossible to turn under the edges due to the highly dimensional embroidery. Instead, I used strips of Ultrasuede from my stash. I LOVE it when I can use something I already have! The silk was free and I already had the shade tape and cord. All I had to buy was a small scrap of wood for the mounting board, a cleat and three screw eyes for a total of $4 and change.

I’m so pleased with the way this turned out! I wanted the shade to be extra long so that I could keep it closed but still have the interest of pleats at the bottom. This woven-stripe organza works very nicely for a soft shade and is easy to work with (except that it ravelled like crazy!). Please forgive those ripples on the left – nothing a few minutes with the steamer won’t fix.

romanshade1

romanshade4

Here you can see the Ultrasuede trim a little better.

romanshade2

I used a wooden cord end from my stash to neaten up the pull cords. I knotted the cords in two places: half-up (in case I want to open the window) and fully down. That makes it easy to put the shade at the desired height.

romanshade3

I’ve made many Roman shades over the years. They aren’t difficult as long as you are accurate and careful in your measuring and ring placement. The most important thing I can tell you is not to freak out if your shade doesn’t pleat nicely at first. The shade must be trained so raise it up, adjust the pleats and leave it alone for a dayor so. Once trained, your shade will fold up nicely every time.

I am still planning on using the embroidered fabric for the valance. I thought I had a small decorative rod around here somewhere but I can’t seem to find it so I won’t be able to do that today.

15 Comments

Filed under Sewing for the Home

Pool table cover – Final

Woohoo! It’s finished! This is certainly not a project I am anxious to tackle again anytime soon. The sewing was easy enough but trying to control so much (nearly 6 yards) heavy vinyl was very tiring. My shoulders, neck and arms are killing me! In a real workroom, the machine’s power stand would be inset into a large work table. I’m not that lucky so I had some of the cover resting on a chair next to me and the rest on my lap.

I wanted the finished cover to have plenty of ease – this is just a large cat bed, after all. 😉 A snug cover would have turned it into a cat trampoline. I somehow miscalculated the length, not allowing enough ease for the center of the cover to lay flat against the table. Rather than remove the sashing strips (ugh) I borrowed yet another idea from my quilting friends: double sashing strips a la the Log Cabin pattern. I simply cut down all four sides and added a second set of strips. The ones on the end are a wee bit wider to make up for my mistake. Not perfect but not bad enough that I’d want to start all over. It’s a pool table cover, after all. Besides, none of my friends carry a tape measure with them.

I’m very happy with the way the corners turned out. I used the same technique that I used on my son’s tailored bedskirt. I sewed the side pieces on first then added a 9″ wide piece underneath. I hemmed the underpiece but left the sides unhemmed to reduce bulk.

I think one of the hardest things about a project like this is figuring out what to do as you go along. I can tell you how much ease I like in a straight skirt (2″) or how much ease I like in a pillow cover (-1″) but I’m a bit lost when it comes to pool table covers so I had to wing it and really exercise my sewing brain. It will be easier next time. Just let me rest for a few years.

Last, but not least, I have to praise Connie, my wonderful walking-foot machine! I am sooooo glad I bought her. She sailed through this project with flying colors, every stitch as perfect as the last. Mwa!

I was a bit intimidated when I first brought her home. Knowing that the foot could walk right over my finger was a little scary – especially when you take a look at the ginormous needle (I think this one is a 22). After two big projects and a couple of purses, we’re old pals.

7 Comments

Filed under Sewing for the Home, Sewing Machines

Pool table cover – Part 2


I didn’t get as far on the cover yesterday as I had hoped. I spent the morning in the vet’s office with a very sick Winnie Pooh – 2nd time this week, sigh. We all know how these things can happen with pets and children. Hopefully, this is nothing serious but we will find out for sure when her blood work comes back today. So, I spent yesterday afternoon and evening rushing to finish my real work and didn’t get back to the cover until last night. The top is finished, I just need to add the skirt – if that’s what you want to call it. 🙂

I really like black purses and shoes with white topstitching. I’m not sure why, I just like that look. I thought it might be a nice way to accent the cover – a way to break up the huge expanse of black. I’m very happy with the way it looks.

Here is the top before adding the sashing strips on the long sides. In the background you can catch a glimpse of my husband’s pride and joy, a 1952 Seeburg Select-O-Matic 100 jukebox. It is the jukebox featured in the opening credits of Happy Days and was the first jukebox to play both sides of a record. About 10 years ago, my son and his friend broke two of the mercury glass tubes on the front while playing pool, a sure-fire way to make a grown man cry. Luckily, I was able to find chrome replacement tubes. It’s just not the same but then we all have our battle scars, don’t we?

Here is what I’m trying to protect. It’s no secret that I love ALL shades of red. I think every room needs at least a little bit of red. My husband doesn’t mind and my son has happily inherited my love for red so I’m able to indulge myself as much as I want.

I probably won’t get this finished today, it being Friday and all. Friday is usually a crazy work day for me so I’ll get back to this tomorrow.

3 Comments

Filed under Sewing for the Home

Pool table cover – Part 1

My Hot Patterns Sunshine Top is all ready to be cut out and then, once again, I am distracted by my very demanding house! Way back, in the beginning of June, I had our pool table recovered. At the same time, I ordered a custom cover for the table – naturally, my table would have to be a slightly odd size – none of the ready-made covers will fit. Naturally. Well, here it is August and I’m still waiting for my custom cover. I called the shop two weeks ago. They can’t find my order and will call me the next day. I’m still waiting. I am so sick of looking at the white sheets that have been covering the table for two and a half months. You see, we have to keep the table covered because my cat, Kanga, thinks the pool table is a really great bed. I don’t have to tell you how difficult it is to remove cat hair from wool felt. I won’t even tell you about the little hairball “accident” she had a few years ago. The table needs a cover, period.

While I would much rather have a cover made from a beautiful decorator fabric, I settle on vinyl simply because cat hair won’t stick to it and any little spills can be wiped off with a damp cloth. I’m becoming very practical. The less I have to clean the more sewing time I will have. 🙂 I decide on marine vinyl because it is a nice weight and fairly thick. So, I measure the table. It is 56″ wide. Of course, most marine vinyl is 55″ wide so I know I will have to do some piecing. Just to make things more difficult and time-consuming, I decide to piece a design rather than just straight seams. Here is what I came up with (very quilt-like and I’m not even a quilter!):

Stay tuned. With a little luck, I will have this sucker finished today!

5 Comments

Filed under Sewing for the Home