Category Archives: New Look

Vogue 1224 Tracy Reese Dress

Things have been very busy for me since I returned from Couture Boot Camp! I am still working on my strapless dress whenever time permits but found myself with a free day today so I thought I’d whip up a simple summer dress from Vogue 1224 by Tracy Reese.

v1224

I have always loved a peasant style blouse or dress for summer and this is such a cute casual dress that will work well with a pair of flats, don’t you think? As soon as this pattern was released I knew I’d use this jersey from Gorgeous Fabrics that has been in my stash for a couple of years. I’m such a copycat!

v1224a

I made a size 8 with a 5/8″ full bust adjustment (which I really didn’t even need since there’s a lot of ease) and added 2″ to the length of the skirt. I found the skirt to run pretty large and ended up removing 2″ from the circumference to get the slim look as shown on the envelope. Since this is a very busy print, I omitted the lining. I certainly don’t want that extra layer if I don’t need it. Lastly, I allowed 1.25″ for the hem as I find 5/8″ to look very skimpy.

The directions have you stitch a separate elastic casing into the waistline seam. Since I didn’t want any unnecessary bulk at the waist, I omitted this step and simply pressed the skirt seam allowance up and used it to form the casing. I also made a belt from the leftover fabric to give it a more finished look. The belt was cut 2 yards by 6″ wide and stitched in a 1/4″ seam – perfect to wrap around my waist twice.

I’m really pleased with the way this turned out and the almost instant gratification I got from this pattern!

I also just finished another New Look 6429 which I have made several times already. I needed a summery interview dress that would work well with my white pique jacket and this fabric was perfect.

nl6429a

Instead of a facing, I bound the neckline edge – very fast and easy!

nl6429b

42 Comments

Filed under New Look, Vogue

New Look 6454, The Couture Version – Part III

Once the bodice had been hand basted together and I had another fitting, I stitched the dress together by machine. Notice that I took a smidgen off the bust curve of the Princess seam.

stitching

All of the seams were then trimmed, well clipped, pressed and

bodice

catchstitched to the underlining.

catchstitching

The next step is to insert the zipper – yay, we are coming down the home stretch! I pinned and then hand basted the zipper opening and will now insert the zipper by hand. Notice that I included the silk crepe de chine lining in my pleats to give them additional fullness and support. The skirt is also underlined with muslin.

zipper1

zipper2

I hope to get back to this by the weekend. I have no a/c right now and the thought of standing over a hot iron isn’t very appealing!

Phyllis had asked about my underlining yesterday so I thought I’d go into that a little more. Since my dress has a waist seam (it’s actually slightly low waisted but that’s fine) I was able to sew the boning channels through the two underlining layers. Had I not had two layers I would have stitched separate channels to the underlining. The underlining/boning unit is then treated as one with the fashion fabric. My waist stay will exit the lining (through the use of buttonholes) a few inches from the zipper opening.

When working with a dress that doesn’t have a waistline seam, a separate corselette must be made (which will end at the waist). The corselette can simply be two layers of cotton which are stitched wrong sides together and then boning channels made through those layers. Once the dress and lining have been put together, the corselette is attached to the dress at the top edge only. The corselette has it’s own closure (I like hook/eye tape the best) and is tighter than the dress itself. Here are some photos I took of one of Susan Khalje’s dresses to illustrate:

corselettehooks

corseletteopen

Notice that the waist stay is incorporated into the corselette whereas mine will simply be hand-tacked to each bodice seam and is otherwise left loose.

22 Comments

Filed under Couture Boot Camp, New Look

New Look 6454, The Couture Version – Part II

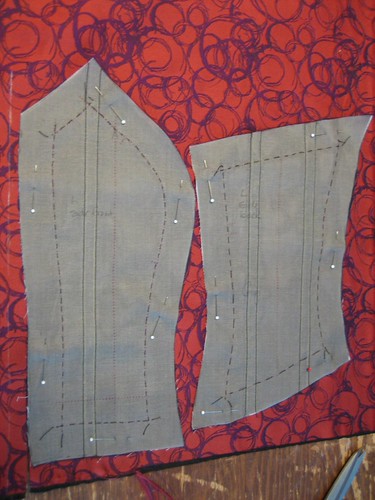
Once all of my muslin underlining pieces were traced and cut in mirror image (so that the markings would end up next to the body) they were hand-basted to an additional underlining of silk organza. Having two layers of underlining meant I could stitch my boning channels through the layers rather than having to add separate boning channels.

bastedtoorganza

Here is my bodice all laid out in order. Looks gigantic, doesn’t it?

bodicelaidout

I then used these pieces to cut my fabric. I cut from the wrong side since my underlining pieces were in mirror image. The left and right side of my body are just a little different, something that is very noticeable in a very fitted garment. The narrow rows of parallel stitching are my boning channels.

cuttingfabric

Next, I removed each previous row of basting and hand-basted all three layers together on the stitching line.

bastetofabric

Notice that here on the center front panel, a fisheye dart was pinned out and marked. I did not stitch it in this dress but may use it on a future version.

frontboning

One of the highlights of the week was dinner with Cidell. Finally, after all these years we meet! Left to right are Gretchen, Anna, Susan, Robin, Barb, Me and Cidell (photo courtesy of A Little Sewing). Great fun!

dinner

15 Comments

Filed under Couture Boot Camp, New Look

New Look 6454 – The Couture Version, Part I

PI decided to make a very fitted strapless dress in Couture Boot Camp because a) that’s a tough thing to fit on yourself and b) I’d never done it before!

I selected New Look 6454 as my starting point because I liked the shape of the bodice.

newlook6454

Since I knew I was going to drape my own pleated skirt I only made a muslin of the bodice. I began with my usual size 8 and altered for a full bust on the front.

frontpatterns

On the back, I made a broad back adjustment and added a seam allowance at the center back for the zipper. I tend to prefer a CB zipper over a side zipper because it’s easier when you have to fit yourself (since no alterations are made at the CB).

backpatterns

At the muslin stage, the side front was split into two pieces and more material removed through the waist (the shaded area). Notice that all of the stitching lines and grainlines have been machine stitched onto the muslin. One inch seam allowances were added throughout. The parallel lines marked with a “B” are the boning channels.

muslinsidefront

After the final muslin fitting, I traced my muslin pattern onto a muslin underlining, again marking the seamlines/grainlines (with tracing paper only this time) and adding 1″ seam allowances. Note that, since my body is not symmetrical (whose is?) I traced the pieces in mirror image so that the markings would end up next to my body and be visible from the inside of the garment.

muslintracing

The fabric I am using is a lustrous Vera Wang brocade from A Fabric Place (Michael’s Fabrics for you internet shoppers). Isn’t it gorgeous?

verawangbrocade

13 Comments

Filed under Couture Boot Camp, New Look

A Diversion – New Look 6891

I made this pattern just over a year ago and it has become a favorite. It’s one of those blouses that, every time I put it on, I wonder why I only have one. I had pulled the pattern out a few months ago in hopes of making myself another one so, when I needed a project to recover from my recent disaster, there it was! Not one to let myself off the hook too easily, I did choose to make it in (drumroll, please) silk charmeuse! This is another Golden Oldie from Maggi’s For Fine Fabrics.

heartsfront

I used my 1.25″ right-angle binder to make quick work of the neckline and ties. I had to piece the binding at the CB but the seam went through the binder without a hitch. I made sure to press and trim the seam well and you can barely see the join.

bindingdetail

heartsdetail

I will probably make one more quick item before I return to the Milly blouse. I’ve leaning toward the red charmeuse but the chiffon I bought yesterday isn’t the greatest match so I have one more place to check before I get started. I’ve put Sunday’s disaster behind me and am movin’ on! As Debbie said, do I really want to be bothered with a blouse that stains so easily? Uh, no.

24 Comments

Filed under New Look

New Look 6891

My honey’s first home game is this coming Friday and I am determined to wear comfortable footwear! Believe it or not (haha), I am not a sensible shoes type of girl and spent last football season on the sidelines in high heels. This year, I am planning ahead and making some cute outfits to wear with comfortable shoes, namely my Frye Campus 14Ls.

campus

As much as I love chunky boots, they are a bit problematic, stylewise. I was thumbing through an old Anthropologie catalog the other night and immediately fell in love with this outfit (and how awesome is her hair!?!?!?). Yes, I detest skinny jeans (really, what woman wants to look like a lightbulb?) but they are perfect tucked into boots! Hopefully, I’ll be able to find a pair by Friday. Since it’s still quite warm here, I’ll be skipping the jacket for now. But I’d wear boots year-round if I could – Lord knows I’ve tried!

anthropologie

For the tunic, I decided on New Look 6891 in a beautiful rayon challis from the now-defunct Textile Studios fabric store. This fabric has been in my collection at least three years.

nl6891

What I liked about this pattern was that it didn’t seem too full. Normally, I would never buy a pattern that starts at a 10 since I hate having to grade down the shoulder and upper chest but I liked this enough to deal with that. As usual, I started by tissue fitting and was pleasantly surprised that the shoulders fit very well and there was enough ease (39″ in the size 10) through the bust that I was able to skip the FBA. I did make my usual forward shoulder, sway back and sleeve length alterations but that’s it.

paisleytunic

For such a simple top that’s very easy to put together, it is surprisingly flattering. The neckline binding/ties took more time than anything else. There are only a few gathers over the bustline – if you needed to make an FBA it would be so simple to move the additional fullness there.

This is definitely a keeper that I’ll be making again. And, for those of you who’ve inquired, yes, I am working on those HP pants! I have a few irons in the fire, so to speak, and trying to get the most pressing ones out first.

26 Comments

Filed under Fabric, New Look, Shoes

Tucked Blouse

Things were pretty hectic yesterday and today so I haven’t been able to finish fitting the shirt pattern I want to make next. I have plans tomorrow night and Thursday night so I probably won’t get back to it until Saturday.

I have almost finished my red rayon georgette blouse though. All I have left is the bottom hem which I may try to finish up real quick now. I made four 1/2″ deep tucks on each sleeve and four 1/4″ deep tucks on the bodice. I had planned on making more on the bodice but I discovered that a good 1/3 of my fabric was flawed so I ran short of fabric. Too bad because the fabric is absolutely beautiful. It has very slight variations in color making it look hand-dyed. (Please pardon the background – I’m in the process of relandscaping my backyard!)

redblouse

tucks

Because I didn’t want the bulk of the tucks (especially on the sleeves) in the neckline casing, I made a separate casing with a crossgrain strip of fabric. Boy, that sure was a lot faster and easier than a 5/8″ double-turned casing!

I hadn’t planned on making yet another blouse with this pattern but when I saw the red georgette I had to do it. I hope it looks different enough from the others but, honestly, I don’t mind having multiples. Even in RTW, I am a repeat offender. 🙂

12 Comments

Filed under Fabric, New Look

Anna Sui Silk Peasant Blouse Final

I finished up the blouse last night and I’m very pleased with the way it turned out. I really love this pattern! It’s wonderful to have something light and airy wafting around you on a steamy day. Now I think I need a pair of white jeans to go with this.

annasuifinal

I made this version 3.5″ shorter than the others. It not only looked better shorter but it will also go nicely with my white shorts.

Here’s a closeup of the bodice. I like a little bead or something finishing the cord ends. For some reason, the seam looks a bit wonky in the photo – probably from me adjusting it on the dressform. Why is it that you always see things in photos that you miss in real life?

annasuifinaldetail

Not sure what I’ll work on this weekend. I’ll have to think about that this afternoon. Maybe something where I can use the new binder…

19 Comments

Filed under Fabric, New Look

Anna Sui Silk Peasant Blouse III

I worked on the blouse bodice last night. I decided to add a 2″ strip of the contrast to the upper bodice and then bind the center front edges.

binding

Yesterday, Jan pointed out the adorable yellow birds on a wire in the coordinating print. I wish I’d read her reply before I got this far:

buttons

Yes, ladies and gentlemen, it’s yellow gravity-defying sideways-sitting birds. I really don’t want to redo this! I will just hope that, like me, most people won’t recognize what they are. What do you think?

Because I used bias binding at the center front I needed some other way to close up the lower section since I wasn’t able to stitch it closed the conventional way. Ordinarily, I’d just leave it open but t’s too darn hot to have to wear a cami! I found these vintage mother-of-pearl buttons in my collection and used them to stitch the opening closed. Because silk chiffon is delicate, I backed the opening with a strip of bias handstitched to the binding.

18 Comments

Filed under Fabric, New Look

Anna Sui Silk Peasant Blouse II

I dreamt about this blouse all night, mostly about the sleeves. Happily, I had a little free time today and was able to get them finished. I had already planned out which part of the coordinate I’d be using as a hem band. I chose an area that had black at the top so that the French seam would not show through the chiffon. Because the fabric is so sheer, using a doubled band wasn’t possible.

The bottom of the sleeve is curved so I slightly eased the straight band at the seam.

band

I had planned to use a simple narrow hem but then I thought, why not make it a little more special with a bias binding? I cut the binding 1 3/8″ wide and used my 1 1/4″ binder. Because the fabric is so silky, I knew it would narrow a bit as it went through. Once you master your sewing machine attachments (practice, practice, practice) they make your life so easy! I bound both sleeve hems in less than 10 minutes, including cutting the bias.

binder

bindigndetail

All of this work was done flat and then a French seam was sewn at the underarm. Here’s the finished product:

finishedsleeve

Next I’ll be figuring out how to incorporate more of the coordinating fabric onto the bodice. The sheerness of the fabric complicates everything just a little bit!

Parting Shot: My best friends just returned from Europe and, knowing how much I love this sort of thing, brought me back some hand-made soaps they found in an open-air market. It smells heavenly and it’s wrapped in the Nice sports page!

soaps

15 Comments

Filed under Fabric, New Look