Monthly Archives: June 2010

McCall’s 5860 – Final

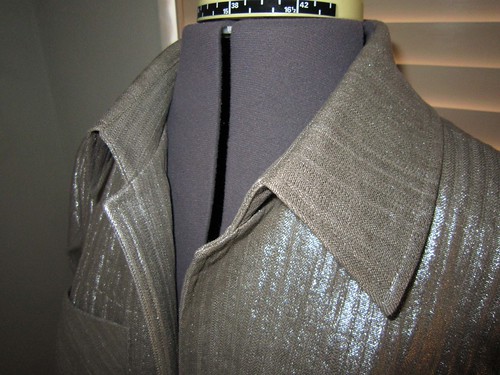
Yay, it’s finished! I didn’t have much left, really, but I like to take my time when it comes to my buttonholes. I made keyhole buttonholes on my Singer 500A “Rocketeer” using the Singer Professional buttonholer (which is for zigzag machines). Because my fabric is textured, I stitched around three times for a nice dense bead.

buttonhole

rocketeer

You’ll notice that I ended up using a different button. After testing, I decided that this larger tack button looked better. I actually think the shininess of it makes my fabric look less shiny.

frontfinal

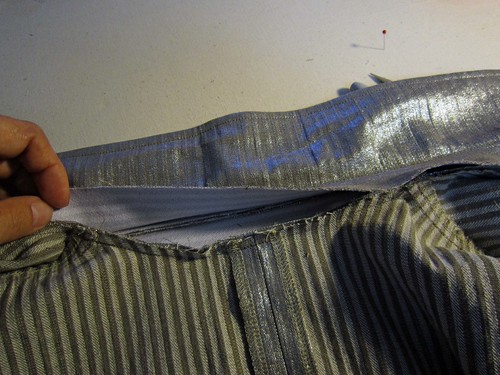
Here’s a close-up of the flap, which I also cut on the bias to match the pockets.

flap

I am thrilled with the way this turned out and would definitely use this pattern again. (If you’ve never tried a Palmer/Pletsch pattern, you really should, you won’t be disappointed.) Too bad I’ll have to wait quite some time before I’ll be able to wear it!

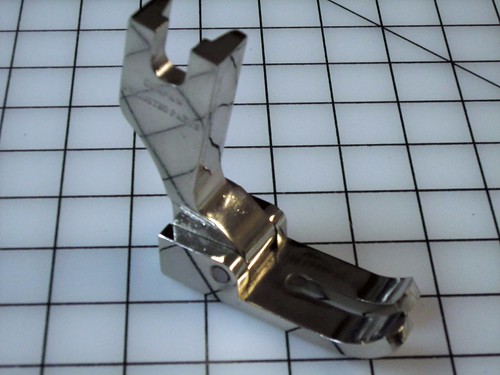
PARTING SHOT: I’ve been wanting a 2nd single-needle machine for awhile because I’d like to keep one set up for binding (yes, I’m spoiled, I know!). I bartered for this very lovely Consew high-speed straight stitch. My only complaint is that the top is green particle board instead of white plywood so I know I’ll eventually want to replace it. This will become my main machine and my beloved Consew 105 will be set up with a right-angle binder – can’t wait!

consew

48 Comments

Filed under McCall's, Sewing Machines, Year of the Jacket

McCall’s 5860 – Part IV

I was hoping to finish up today but after working in the hot sun laying sod yesterday, I am just too tired! Sewing while tired is never good so I will leave the rest for another day.

As I was constructing and attaching the collar, I thought some of you might like to see how I do this as it’s a little different from the way most patterns suggest. This jacket has a really lovely collar on a stand that is actually attached the same way one would attach a convertible collar when there is no yoke to enclose the neck edge.

Before I begin, I like to shape my collar around a ham. I steam it, shape it and allow it to cool.

collar

Next, I sew the outer stand to the jacket, leaving the inner stand free. Notice that I’ve reduced my SAS to 1/4″. Smaller SAS, either 1/4″ or 3/8″ are much easier to sew accurately and you won’t need to trim them later.

collar1

Then, the front facing is stitched on through all layers. Stop your stitching and backtack about 1″ or so from the shoulder seam.

collar2

Clip through all layers. (Can you see I’ve been playing around with my new Photoshop, lol?)

collar3

Turn out the facing, push all of the seam allowances between the clips up into the collar,

collar4

and neatly close the collar by machine. Easy, even in this bulky fabric.

collar5

As I said, this is a really lovely collar! I may try adding this type of collar the next time I make a convertible collar blouse.

finishedcollar

The jacket is finished except for the buttons, buttonholes and pocket flaps. I had to take 3.25″ off the length. Because I’m only 5’3″, I found a shorter length more flattering for me. I also had to take in 1/2″ through the hip at the side seams because I’m not as curvy as the pattern. Oddly, I thought the sleeve cap didn’t have enough height so I simply slipped it out about 1/4″ at the shoulder tapering to nothing 2″ on either side (I’ll add more height to the cap next time). I know this still looks a bit DTD, but I assure you, it isn’t quite this shiny in real life!

front

To offset the sparkle of the fabric, I have chosen some matte-finish pewter tack buttons that I bought in NYC a few years ago.

tackbutton

19 Comments

Filed under McCall's, Year of the Jacket

McCall’s 5860 – Part III

I did manage to squeeze in a few hours of sewing time today and got pretty far along on the jacket. The back has been sewn:

back

as have the fronts (how much does this look like a Duct Tape Dummy?):

frontnopocket

Since I am pretty curvy up top, I cut the pockets on the bias so that they would be better able to follow the contours of my body. I have done this with jean jackets in the past and it’s always worked out really well. To shape the pocket, I press it over my tailor’s ham and allow it to cool. In this picture, you can see the thread tracing I used to mark the flap placement. I rarely thread trace but nothing else would show up well enough on the right side of this fabric.

pressingpocket

Here it is back on Ethel. I will save the pocket flaps until later because I need to select buttons and make buttonholes before they are sewn on.

frontwithpocket

I also finished one of the sleeves, which has the traditional jean jacket placket – very easy!

sleeve

12 Comments

Filed under McCall's, Year of the Jacket

McCall’s 5860 – Part II

The pattern has been fitted and altered and the fabric cut and fused. I don’t know how much sewing, if any, I will get done today. I am this close to being ready to lay sod where the old stone patio was (not fun digging up all of those rocks, let me tell you). Frankly, it is hot as blazes and I just want to finish! I have decided no more yardwork until the fall. Everything I am able to see when I’m in the pool will look good – the rest can wait until it cools off.

fabric1

This fabric is really cool. I cut everything from the backside because the stripes made it so easy to keep everything lined up. This came from Cynthia’s in Tamarac.

fabric2

5 Comments

Filed under McCall's, Year of the Jacket

McCall’s 5860 – Part I

Today I am working on this Palmer/Pletsch jean jacket. Yes, I have a long list of things to sew but this is a store sample for my friend’s shop and I want to bring it with me on Monday evening (my last Beginning Sewing class). I’m using a TDF laminated cotton/linen from Elliot Berman Textiles which is in the washer as we speak.

5860

Look at this unexpected surprise I received yesterday! I am so excited about this because I’ve been wanting one for a year and a half. I know what you’re thinking: meh, it’s a commercial straight stitch foot, big deal.

foot1

Actually, it is a big deal – it’s a paperweight! My friend received one just like it from one of the sewing machine suppliers in 2008 and I’ve been threatening to lift it since. Now I have my own!

foot2

18 Comments

Filed under McCall's, misc., Year of the Jacket

Bird Blouse

I finished up my voile “bird blouse” today. I just love it, it is going to be so cool to wear this summer. Again, the pattern is Simplicity 3786, which I have made several times before. This was a Summer 2009 favorite! The fabric came from Cynthia’s Fine Fabrics.

bird1

My favorite part of the pattern is the tucked front. I press-mark these tucks, making sure to measure carefully, because they are difficult to mark well on these lightweight fabrics.

bird2

As to the Wax Incident, I was able to get the wax out but not the remaining ring and stain so the dress is history. No worries, I’m over it now and will make it again after the 4th.

Last Sunday, I removed the drill cover from my pressing board and discovered that the wax had not only bled through both layers of drill but also through my padding so I was forced to start from scratch. Once I get the padding on the board I staple the first layer of drill on. The 2nd layer is then duct-taped on. When it gets dirty, I don’t have the tedious task of removing staples and can easily pull the cover off. I bought my drill at JoAnn’s and it is about the worst quality I have ever used. Get it somewhere else if you can.

board

Parting shot: A little unemployment humor from today’s Miami Herald. I’ve had a lot of experience with the latter in my personal life so it made me LOL! 😉

cartoon

31 Comments

Filed under misc., Simplicity

Quick Summer Sewing

And I have cut out and made the front tucks in a pretty voile blouse from Simplicity 3786.

birdblouse

I made this a couple of times last summer and it is a wardrobe favorite. To refresh your memories, that is the pattern I used for my dotted Swiss blouse:

dottedswiss

Each time I wear it I ask myself why I don’t have more!

21 Comments

Filed under Hot Patterns, Simplicity

HP Deneuve Tuxedo Shirt – Final

All I had left to do today was finish up the sleeves and cuffs. The pattern comes with long, elbow-length and short sleeves. I wanted more of a 3/4 sleeve so I cut 8.5″ off the long sleeve – 2″ of which I would have to shorten anyway since I’m short. I’m really, really happy with this length. It gives me some sun protection but is still cool. I used the cuff for the elbow-length sleeve and just shortened the ends a little which worked perfectly since I didn’t want it too snug.

For those of you who hate making sleeve plackets, you’re in luck. This pattern comes with a 2-piece sleeve with a seam at the opening edge – how easy is that?

cuff

Some of you asked about sizing for this pattern. I normally use a size 6 (with adjustments) in HP but here I wanted a more oversized fit so I used an 8 and brought the shoulders in 5/8″. For reference, I use an 8 in The Big Four and Simplicity. I always feel it’s good to have extra ease with linen and this was the easiest way to get it. Since HP is drafted for someone 5’7″ and I’m 5’3″, I always have to shorten everything (except pants because I’m longer legged). That being said, I did not shorten this top because I wanted something that would cover my derriere if I was wearing it over a swimsuit.

deneuvefinal
I really love this style and it’s easy to sew – a winning combination in my book! Next up will be the dress – probably in white but we’ll see. Right now I’m off to have a poolside Margarita!

19 Comments

Filed under Hot Patterns

HP Deneuve Tuxedo Shirt – Part II

Once the bib was finished, the rest of the shirt body went very quickly! Later today or tomorrow, I’ll finish the sleeves and set them in. Sorry about the wrinkles – that’s linen for ya!

deneuve

bib

Here you can see how the inset collar is attached to the yoke. All of this was so ridiculously easy to do and gives a very professional finish.

yoke

11 Comments

Filed under Hot Patterns

HP Deneuve Tuxedo Shirt – Part I

I managed to get everything cut out yesterday. I had the hardest time deciding on fabric but finally chose this hot pink Irish linen that’s been in my stash *forever*. I read through the instructions for the bib last week when the pattern arrived and couldn’t quite wrap my head around it (which is not at all unusual for me). But, once I started sewing, the diagrams made perfect sense. Trudy is such a genius, the bib looks like it will be a little fussy but it couldn’t be easier!

bib

The bib is fully lined so, since my fabric is lightweight, I used self-fabric. Now, the instructions advise you to interface the bib lining – I did not because I wanted a softer look. Whether you interface or not will depend on the fabric you choose. I only interfaced the collar, button band and cuffs.

Just so you understand the construction, here are some photos of the right front (the overlap). First, the right front is sewn to the right front lining piece with the button strip sandwiched in between. Naturally, you’ll want to make your buttonholes first.

Then, the collar is inset into the entire bib/bib lining unit. The seam is then graded, clipped and pressed towards the collar. You can’t see it very well but you are looking at the back side of the button strip which has been pressed over the bib itself (the bib lining is on the right).

The left edge of the button strip (as shown below) is the hidden placket fold line so, once the collar neckline edge has been sewn, the covered placket is automatically formed.

right1

Then the collar is folded RS together and stitched along the neckline and turned (the shoulder edges will be caught in the yoke later). The pattern instructions call for securing the collar edges together by stitching in the ditch but I edgestitched all around instead.

righ2

righ3

Here is the completed left front (the underlap), which is sewn the same way. The buttons haven’t been sewn on yet. The pattern calls for five buttons on the band and one on the collar but I only had five in total so I improvised. Both sides are completely clean-finished inside and out – just beautiful and so simple!

left

Parting shot: The Brassavola orchid is blooming today! I think it is really happy with it’s new home under the newly-pruned firebush.

brassavola

6 Comments

Filed under Hot Patterns