
Everything is finished except for the toggles and I don’t think I’ll get to them tonight. I started feeling a little under the weather this afternoon and then traffic was a nightmare so I got home a bit later than expected – 45 minutes to drive 6.5 miles, argh! I don’t feel alert enough to work on the most important part of the coat (the toggles!) so I’ll save that for Saturday. And I promise I’ll post the steps!
Instead, I thought I’d write a quick post about bagging a lining. Lots of books cover bagging but most of them don’t ever mention how to properly deal with that little bit of unfinished facing where it meets the hem. So you try to make it look okay with handsewing but it never really does. I’m going to show you how to finish that area easily and neatly by machine. Now, I’m not a technical writer so I just sewed it and took photos of the steps – hopefully the steps are clear. For more professional instructions please refer to Palmer/Pletsch’s jacket book and/or DVD (I don’t believe I’ve ever seen this technique covered in any other home sewing/tailoring book).
To use this technique, partially sew the facing/lining seam (leaving at least a few inches unsewn at the bottom) and press up the jacket hem (but do not stitch). Leave a large opening in one of your sleeve lining seams so that the jacket may be turned right side out later.
Step 1 Turn the facing back and stitch, stopping 5/8″ from the edge (or whatever your facing/lining seam allowance is).

Step 2 Trim the seam allowance.

Step 3 Right sides together, stitch lining and hem allowance together. I used a 1/2″ seam allowance in this instance. This lining was a ravelly nightmare!

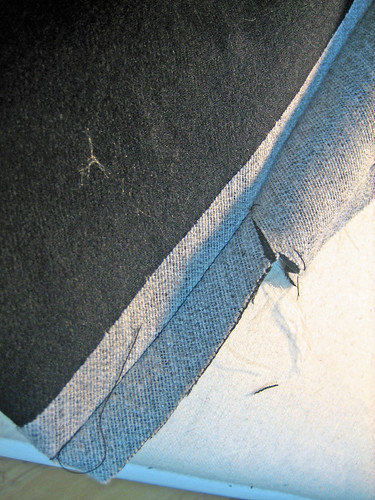
Step 4 Clip jacket front ONLY to the point where you ended your stitching. The wonkiness you see is the hem being pulled up by the lining – pay no attention to that. 🙂
Step 5 Turn hem allowance up (right sides together) tucking lining inside.

Step 6 Fold facing back out of the way exposing lining/facing seam.

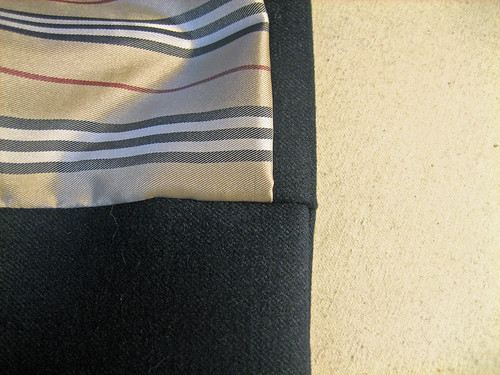
Step 7 Stitch remaining lining/facing seam down to the hemline.

Step 8 Turn RS out and Voila! even before pressing it looks good.
Step 9 After pressing.

Step 10 The jump hem is formed automatically.

At this point, I hand stitch the hem, attach the sleeve linings to the hems by machine and then turn the jacket right side out through the opening in the sleeve. Stitch the sleeve opening closed either by hand or by machine (my preferred method). If your sleeves have vents, it is easier to hand stitch the lining to the hems after turning the jacket right side out.
ETA: I originally learned this technique from Kathleen at Fashion-Incubator. I’ve been using it for awhile and couldn’t remember where I learned it until I was reminded today. Once you do it once or twice it will just stay with you! Here’s the original link, part of the Nameless Tutorial series: Bagging a Lining. Enjoy!

I recently finished a lined coat and found the pattern instructions and books pretty unhelpful. I ended up finishing it by hand but am not particularly happy with the result, thank you for posting such a helpful post!
Genius! I’ve always wanted to learn how to do this Gigi!
I have never seen this done. What an incredibly professional result! Thank you so much, I will re read it several times and try in on a sample to make sure I have the technique down.
Thank You
Marie
Thanks for the helpful advice—your description was very clear and concise. I hope to complete a jacket I’ve been working on this weekend so this info was right on time. Your coat looks lovely—can’t wait until it’s finished. BTW, I just discovered your site and love it! You are quite the Go-Getter sewing 12 jackets in a year. How inspirational!
~Victoria
tenthousandsewinghours.blogspot.com
I was finally to the bagging of the lining of my coat last night and had read and reread this technique in the Jackets for Real People book. I finally figured it out. It’s not too hard after you do it, but wrapping my mind around things the first time can be tricky. Great explaination and it really is an easy way (tho it’s my first jacket so I don’t know any other way).
Your tut couldn’t have come at a better time for me. Tomorrow I begin the lining process on a coat I’m making and I’ll be sure to use your very helpful technique. Thank you, Gigi.
Thank you for this great tutorial! You are so nice to share with us. Your coat looks wonderful.
Thanks Gigi – very professional and extremely helpful!
Thanks for the tutorial. I’m getting excited about working on jackets now. Your jacket is looking great. I’m looking forward to the toggle instructions and seeing the finished product. I appreciate the inspiration!
Thank you thank you for your bagging technique! Now one question, when you fuse interfacing to your jacket pieces, do you block fuse the entire pieces because my fusing takes FOREVER! What is your method? Also, what fusible interfacing do you prefer for a tailored jacket? Have a lovely Christmas and Happy Birthday too for last week! Your coats look just sublime!
Hmmm . . I’m going to try this with the “new” coat. I bag stuff the usual way, but I do end up with a little bit of hand sewing. Might as well eliminate that, too. Thanks for sharing!
Thanks for showing this so clearly Gigi. Would you know, I’ve purchased 2 books on the subject and still couldn’t ‘see’ what was being shown. Your pics are so clear and easy to follow. Not being able to sew this one technique has prevented me from trying to sew jackets/coats. Now I will be able to with the help of your pictures. Many many thanks!
As Usuual gi gi great tutorial. Thankyou for your generosity especially when you are tired and have battled traffic!! I have learnt so much from your blog . Where did you learn to sew like this, are you self taught or did you work in the rag trade ? regards M
So well done, thank you!
Gigi – thanks for posting this! I ordered the book because of your recommendation and I’ve read your steps several times but I’m still getting lost around step 5/6. I think it’s because I actually need to have the fabric in my hands. But since we will be making these jackets together, I will ask my questions when I get to the steps. I’m definitely going to try and line all 12 jackets so that by the end of the year, I will be able to line with no hesitations and/or fears.
I have tried to use this method before with Palmer Pletsch, but have had middling success. Your tutorial is clearer by far, particularly since PP keeps mentioning the dot that is on their patterns and I use Burda. Thanks I will be bookmarking this to use for the coat I am making.
Nancy, the bagging “dot” is simply the point where the lining/facing seam and the hem fold intersect. I have thought about going back and putting a red dot at that point in all of the photos – that might be helpful.
Thanks Gigi. I have a leather jacket planned for spring and I do not want to do any finishing by hand!
Hi Gigi,
Thanks for the tutorial. You mentioned at the end that you hand stitch the hem. Could you elaborate? Do you do it from inside? or from outside. I think I got the bagging technique from this tutorial and from various sources, but none of them mention how to deal with the hem that is not attached to the coat. Maybe it’s obvious so they don’t mention it, but it’s not obvious to me. Thank you in advance!
Kennis
I apologize for not being more clear. I handstitch it from the inside after finishing the bagging but before turning the coat/jacket right side out. Most directions tell you just to tack the hem at the seams but I prefer to have the entire hem attached.
Pingback: Curveball | Tanit-Isis Sews
Thank you so much for this tutorial. I had no idea I could do this at home, I always thought it had something to do with proffessional sewing machines… silly me. I’m definately trying it out. Would you please explain to me where in the sleeve you have the opening? How long will it be?
The opening is left in the sleeve lining and needs to be long enough through which to turn the entire jacket or coat.
Gigi, the place you originally found this was on my site, the nameless tutorial series. Previously on your site you mentioned it but not this time. Here is a comment you left after the second entry in the series:
“This is a great tutorial, Kathleen! I am definitely going to print it out and save it – I’ve been finishing that last little bit of the facing with a Hong Kong finish for lack of knowing a better way. This is such an improvement! “
Oops, Kathleen, please forgive me! Of course, I do remember now and will amend my post accordingly. I never did print it out as it just stuck with me after doing it a few times. Thank you for the Best. Technique. Ever!