
First, I have to say that I am so touched that you guys missed me! Believe me, I have missed you too! As some of you have speculated, I did not get a job, sigh. But, my sewing classes are going well so that makes me happy. I just love my students, they are so much fun that I look forward to class every week (as I hope they do!). Things have just been busy so I’ve been spending my precious spare time sewing rather than blogging.
I did finally finish my HP Riviera jacket and LOVE it! I’ve had this pattern since it first came out and am so mad at myself that I’m just now getting around to making it.
I used a yummy wool/lycra doubleknit that I bought from Nancy Erickson back in 2003. Oh, how I love working with wool! It practically sews itself. I did prewash this fabric by hand with Orvis (from the local feed store), air dried and then steamed thoroughly before cutting. I seriously doubt I’ll be hand washing this jacket but I could if I wanted to. The fab buttons came from Cynthia’s Fine Fabrics and I used Pro-Sheer Fusible interfacing from Fashion Sewing Supply.

The jacket goes together very easily and quickly. The first thing I did was to construct the pocket flaps. The horizontal flaps are constructed as you normally would. Because my fabric was thick and spongy, I did all of my topstitching at 3/8″ vs. 1/4″ (which looked skimpy and cheap).

The vertical pockets are sewn on two sides only. The top is left open because it will be caught in the yoke seam later.


Pocket construction is very simple. First, the vertical flaps are stitched to the fronts:

Then, the pocket bags are stitched on top of the flaps,

so you end up with this:

The other pocket bags are stitched to the side front:

then the front and side front are sewn together at the top and down the lower front. Any topstitching alongside the pocket flap should be done now, before the pocket bags are sewn shut.

Here’s the finished pocket (before pressing):

Here it is pressed and topstitched. As I mentioned before, the area in front of the flap is topstitched before the pocket bags are closed up. Once the pockets are stitched up, the topstitching below the flap is completed.

The body of the jacket has been put together. Now it’s time for the collar!

I know some people have expressed confusion over the HP collar but it’s really very, very easy. You are instructed to sew to the dot but I found it better to just keep on going all the way. I have done it both ways but prefer this way. The seam allowances have been trimmed and graded in this photo – I forgot to take one before I did that but you can use your imaginations. Please notice that I am not a Chicken Clipper!

I then pressed all three seams open over my trusty point presser

and then turned right side out.

I staystitched just inside the dot on the jacket front and clipped to the corner. Then, simply match up the two dots and stitch your inside corner.

Voila! Very easy!

Here is the jacket with the facing partially attached. I always attach it in two steps to make my life easier.

I did make one small change to the pattern and that is to add a hem allowance rather than using facings. Mainly, I did that because I really wanted to have a mitered sleeve vent. If I was going to have a hem at the sleeve it stood to reason that I should have one on the jacket body as well. I didn’t take any photos of the sleeve construction because I figured everyone already knows how to miter a sleeve vent – and this post is already so long-winded!

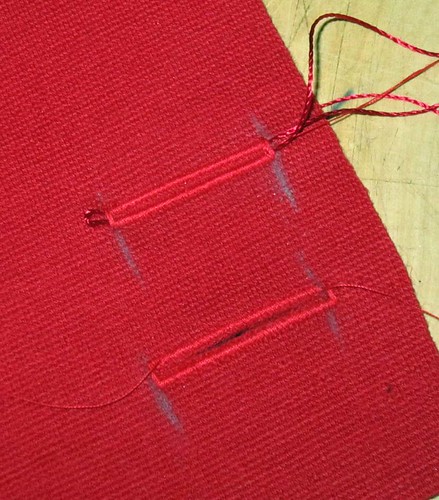
Because my fabric is pretty stretchy, I had problems making horizontal buttonholes. I finally achieved success by fusing a 2nd piece of interfacing with the stable grain on the horizontal and cording the buttonhole. I only had cordonnet in white and black but red Pearl Crown Rayon came to the rescue and worked just fine. (Excuse the blue chalk, this is my sample.)
Wow, that was a very long post, wasn’t it? I’m sure it’s the longest I’ve ever done but that’s what I get for leaving it all until the end. I’m headed back to the sewing room to finish up my HP Mighty Aphrodite tee – I’ll write about that this weekend. Auf Wiedersehen!
10/16/10 ETA: I realized last night that I neglected to mention anything about sizing and fit – sorry! I sewed a straight size 6 (which I need through the shoulders) and needed no alterations except for my usual forward shoulder and a little extra width through the bicep (I blame you for that, Jackie Warner!). Shocking, but true.

It never occurred to me to use a 3/8″ topstitch on wool, but it looks SO much better than 1/4″! I’ve had some gorgeous navy wool that I want to make a light coat out of, I think I may just have to get started on that!
Thanks Gigi, and I’m so glad to see you posting again!
That looks amazing! I bow down to your sewing awesomeness!!!
Thanks for taking all those pictures for us. That’s a great looking jacket!
Looking forward to the Tee. I just “won” that pattern by purchasing it during the sale. Lucky me!
Love it!!! Thanks.
Oh man, what a lovely jacket!
Thanks for sharing all the steps. I made this jacket over a year ago. The results were pretty good, but I did have some errors. I’d certainly consider making this jacket again, especially now that some of my confusion is cleared up!
What a classy looking jacket! Beautifully sewn and excellent step by step instructions. Thanks for sharing!
That is such a great jacket! I can’t believe I’ve never noticed this one before! Love it!
Hi Gigi,
I just found your Blog and MAN, I’m impressed! I have’t done much sewing in the last few years but you make me want to get right back at it.
I noticed your Jacket Counter. Is there a post that shows ALL the jackets on one page? I could go back to January and read ALL the posts up til now, which I probably wiil do later, but I was curious to see them now.
Thanks,
Jeanette
Sorry for the double post, but the email was wrong.
Is there a post that shows ALL the jackets on one page?
Thanks,
Jeanette
Hi Jeanette!
You can find them all here:
https://behindtheseams.wordpress.com/category/year-of-the-jacket/
Thanks for visiting!
Gigi – I’ve had this jacket on my to-be-sewn list for like forever and here you are making this amazing version! I love the red! I love the fabric but I especially love the finished jacket. Thanks for the collar tutorial, I will definitely refer to it when I get around to making my version!
Gigi, I love the beautiful buttons…I have to do the threaded buttonhole although I know how. My suggestion to others on how to make those buttonholes really pop: use wash away stabilizer on top of the fabric. That way your stitches won’t sink into the fabric. Especially good to this on ‘cushy’ fabrics like knits, fleece, etc.
Absolutely gorgeous, as usual.
So this is what Ricki has been working on? It is gawgeous :o). Yes – we miss you a lot!
Gorgeous! The red is bold and so perfect for this jacket and is a hot color this fall. I’m loving wool, too, it behaves so nicely.
It looks awesome! and the post was not long at all… I was surprise to see the end 🙂 Great pictures, and thanks so much for sharing.
Beautiful. Gorgeous details and workmanship. You are really doing well with your “year of the jacket”
I am a retired teacher who is just returning to sewing garments after years of quilting. I have a new Bernina Artista 635, a machine I have long dreamed of owning. I just discovered your blog, and love reading through the wonderful things you have posted. I was really disappointed to not have you posting. Count me among those who missed you and are thrilled you are back! Thank you for this wonderful blog! You are an inspiration to me.
Can I borrow it?
Gigi,
Thank heavens! Your blog has reminded me how much fun garment sewing is. I’m ready to get out my trusty serger, hope I can thread it and do something besides quilting.
Most awesome jacket so far! Glad to see you back.
Gorgeous jacket, hard to believe its a knit and I absolutely love the colour.
Beautiful jacket. I enjoy reading your blog and I am so glad you are back. Your sewing students are truly lucky to have you as their teacher (I hope they know that!).
I really love your jacket. I have that pattern but chose the wrong fabric when I tried to make it. I need to get back to it again.
Another gorgeous jacket from Gigi, most supreme seamstress of the jackets!! I am amazed by your sewing skill post after post, and am glad you are back again- wondered what exciting adventures you were having…
That is a beautiful piece of work, nice to see you back I have missed you writing about your projects.
Beautiful! Love the pockets and red is my favorite!
Linda T
You are a beautiful sew-er, Gigi. Worth the wait.
Giigi, glad you are posting again. I just looked through the jacket archives and you have made up my mind; it is time for me to do a “Year of the Jacket.” I have so many jacket patterns, plenty of fabric and your blog to refer to. Thanks for the inspiration.
I just love this jacket and your post/tutorial. Impeccable! This pattern is on my “wish list”, I don’t have it yet but I should get it. I’m a novice, this looks beyond my skill set, but I’d hate to see them discontinue this pattern, it’s a must-sew!
Wow, great work, thoughtful update, and a new type of FB(icep)A!
Wow! Your work is beautiful. I look forward daily to your blogs, your sewing is an inspiration to all of us. The red is perfect, I had looked at this pattern for months, now mine should be in the mail.
Missed your weekly updates, glad you are back.
Thanks for sharing all the details. A lovely jacket! I will keep in mind the 3/8 topstitching.
Sometimes I feel like you are my sewing twin, Gigi! I have this pattern too and I am so encouraged by how great your version turned out that I may have to move it up on my to-do list. What are you sewing next, just so I know what I’ll be working on…
Thank you for putting so much effort in your posts and taking pictures of alot of the steps. You have alot of patience. You really should write a sewing book or sell DVDs of your tutorials. Anyway, that jacket looks perfect!! 🙂
Oh I’m glad you did this – thankyou. I have the pattern and some grey wool knit and now I’m more confident. Though I’ll never attain your buttonholey perfection in a million years. Wish I could attend your classes but the cross-Atlantic commute would be a bit of a drag.
Gosh I find your work inspirational. Wish I could come to your sewing classes…bit of a trip from Australia!
What a gorgeous jacket and so well constructed. You should be very proud.
What a beautiful jacket, very well-made!!!
Awesome jacket! And love all the details. I’m not sure I would have thought of the 3/8 for topstitching either but it does look fabulous!
That jacket is stunning! I, too, am a wool addict. It’s like sewing with butter. I’ve just done a series of fall handbags in wool melton. I had a problem, however, with my sewing machine handling the loft of the fabric. I have the Singer HD (not impressed). You can be very proud of your new jacket and also of the excellent instructions you’ve provided! Cheers to you!
Your bags sound lovely, I’ll have to hop over to your blog and check them out. We see a lot of Singer HDs in my friend’s shop – they are anything but heavy duty. Look for an old Kenmore from the 70s/80s (the real heavy ones). They are one of the few domestic machines that handle heavy goods quite well.
Wow — I’m in awe! This is such an exciting time for new sewers, with generous-spirited folks like you posting so much information, tips, and photos. It’s really helpful to those of us who want to learn garment sewing, but aren’t able to take classes in person. Thank you!
Love love LOVE it !
How very gorgeous and high-end! Beautiful work Gigi and thanks for all the wonderful explanation.
Please add my e-mail to your blog.
Thank you for asking, Karen, but I don’t have that capability (that I’m aware of). However, you can follow me on Google Reader!
Wow! Can I just say wow! My mother did amazing patterns like this. Thanks for the tutorial.
So beautiful! I have a similar red wool and a copy of this pattern and will make the sad, wonky cousin of this jacket as soon as I get to the ‘Jackets’ chapter of my Bishop Method project. I will be referring to this post often! So good to see your gorgeous work again.
Oh, Megan, you know you will make a super-fantastic version of this jacket. And, unlike me, you will write a wonderfully humorous review of your experiences!
Gigi,
Did you have to do a full bust adjustment?
Beautiful work as always.
Kathy
No, I didn’t – and I’m a 34DD!
Lovely jacket! I need to give this pattern a try.
Beautiful jacket! Your stitching is superb… I’m always in awe!
What a gorgeous jacket…. I’ve just come upon your site and I’ve only gone back to October… what a treat in store to look at all the jackets for the year…
Pingback: Jacket #3 & lots to catch up on « Unzipped